3237469 - 1020A20 crank case oil sump - r + r clean seals for sealant application
- 1092G10 single engine belt r r - 1092A12 crankshaft pulley - r+r for versions with air conditioner - 1092G20 engine component single belt fixed tensioner - one - r + r - 1032D12 timing system protective cover(s) - r + r - 1032D12 timing system protective cover(s) - r + r - 1092G20 engine component single belt fixed tensioner - one - r + r - 1092A12 crankshaft pulley - r+r for versions with air conditioner - 1092G10 single engine belt r r | Name | Connector |
|---|---|---|
| - | Battery | A1B |


 | Name | Country |
|---|---|---|
| 2 | Counter-torque | 1.860.898.000 |


| Collect the engine oil in a suitable container. |


| Name | Country |
|---|---|---|
| 1b | Spanner | 1.860.833.001 |
| Name | Country |
|---|---|---|
| 2b | Spanner | 1.860.834.001 |
| Name | Country |
|---|---|---|
| 3 | Blade | 1.870.718.000 |

 | Fastening | Component | Ø | Value(daNm) |
|---|---|---|---|---|
| 2a | Front and rear bolts | OIL SUMP | M6 | (Engine crankcase side) 0.8 ÷ 1.0 |
| Name | Country |
|---|---|---|
| 2b | Spanner | 1.860.833.001 |
| Fastening | Component | Ø | Value(daNm) |
|---|---|---|---|---|
| 3a | Side bolts | OIL SUMP | M8 | (Engine crankcase side) 2.3 ÷ 2.8 |
| Name | Country |
|---|---|---|
| 3b | Spanner | 1.860.834.001 |

| Fastening | Component | Ø | Value(daNm) |
|---|---|---|---|---|
| 1 | Bolt | MANUAL GEARBOX | M10 | (Crankcase sump side) 5.0 ÷ 6.1 |

| Fastening | Component | Ø | Value(daNm) |
|---|---|---|---|---|
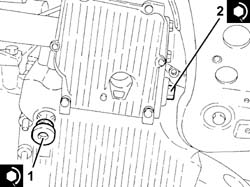
| 1 | - | ENGINE OIL DRAIN PLUG | M18 | (Crankcase sump side) 1.8 ÷ 2.2 |
| Fastening | Component | Ø | Value(daNm) |
|---|---|---|---|---|
| 2 | Bolt | ENGINE LINK AND VARIOUS COMPT.MOUNTS | M8 | (Crankcase sump side) 2.3 ÷ 2.8 |
| Fastening | Component | Ø | Value(daNm) |
|---|---|---|---|---|
| 1b | Bolt | FIXED SINGLE SERVICE BELT TENSIONER | M8 | 2.2 ÷ 2.8 |

| Fastening | Component | Ø | Value(daNm) |
|---|---|---|---|---|
| 1b | Bolt | CRANKSHAFT PULLEY | M8 | 2.3 ÷ 2.8 |

| Name | Country |
|---|---|---|
| - | Counter-torque | 1.860.898.000 |
| Fastening | Component | Ø | Value(daNm) |
|---|---|---|---|---|
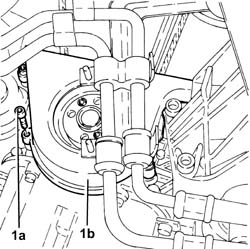
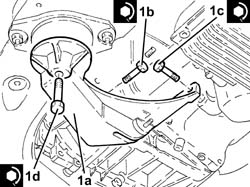
| 1b | Bolt | POWER UNIT RIGID REAR MOUNT | M12 | (Gearbox side) 6.8 ÷ 8.3 |
| Fastening | Component | Ø | Value(daNm) |
|---|---|---|---|---|
| 1c | Bolt | POWER UNIT RIGID REAR MOUNT | M12 | (Engine oil sump side) 6.8 ÷ 8.3 |
| Fastening | Component | Ø | Value(daNm) |
|---|---|---|---|---|
| 1d | - | - | - | - |
| Fastening | Component | Ø | Value(daNm) |
|---|---|---|---|---|
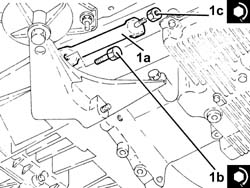
| 1b | Bolt | POWER UNIT REAR RIGID SUPPORT REINFORCEMENT ROD.... | M12 | 6.8 ÷ 8.3 |
| Fastening | Component | Ø | Value(daNm) |
|---|---|---|---|---|
| 1c | Nut | POWER UNIT REAR RIGID SUPPORT REINFORCEMENT ROD.... | M12 | 5.0 ÷ 6.1 |
| Fastening | Component | Ø | Value(daNm) |
|---|---|---|---|---|
| 1b | Bolt | EXHAUST PIPE RIGID MOUNT | M8 | 2.3 ÷ 2.8 |
| Fastening | Component | Ø | Value(daNm) |
|---|---|---|---|---|
| 1c | Nut | EXHAUST PIPE RIGID MOUNT | M12 | 6.8 ÷ 8.3 |

| Fastening | Component | Ø | Value(daNm) |
|---|---|---|---|---|
| 1c | Bolt | RIGID EXHAUST PIPE | M10 | (Front silencer side) 5.9 ÷ 7.2 |
