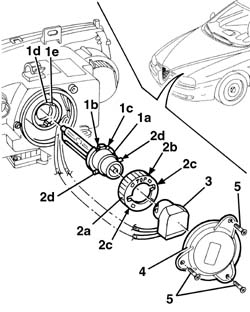
3238452 - 5540B44 dipped beam for one gas discharge lighting unit one lh or rh r r

Removing ( Refitting )  - 7025A12  Engine front sound insulation COVER - R.R. - 7025A14  Bonnet LID - R.R. Open the bonnet lid.
Remove the bulb without the headlamp connected because the bulb reaches a voltage of 20,000 V at the moment of activation and a voltage of several hundred volts is present at the bulb terminals during normal operation.
1. For the left headlamp only. Undo bolts (1a) and remove protection (1b).
1. Undo the bolts.2. Remove the cover.3. Rotate the bulb holder in an anti-clockwise direction (bayonet fitting) and extract it.4. Rotate the ring nut in an anti-clockwise direction and extract it.5. Extract the gas discharge dipped headlamp bulb.
If the lamp is working properly, do not touch the bulb with your hands; if this does happen, clean the bulb with alcohol.
Refitting ( Removing ) Check the condition and the cleanliness of the lamp.
do not touch the bulb with your hands; if this does happen, clean the bulb with alcohol.
1. Place the bulb (1a) in the housing, inserting the seats (1b) and (1b) on the teeth (1d) and (1e), respectively.2. Place the ring nut (2a) in position, with the word TOP (2b) upwards and also ensure that the housings (2c) are aligned with the bulb pins (2d); lastly, rotate the ring nut in the housing.3. Fit the bulb holder and rotate it into position (bayonet fitting).4. Place the cover in position.5. Tighten the bolts.
For the left headlamp only. Position the protection and fix it using the bolts.Check that the front headlamps are working properly.  - 7025A14  Bonnet LID - R.R. - 7025A12  Engine front sound insulation COVER - R.R.