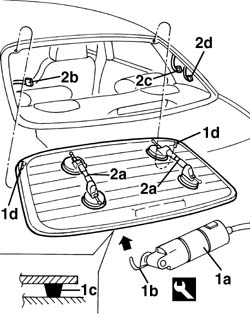
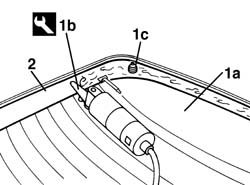
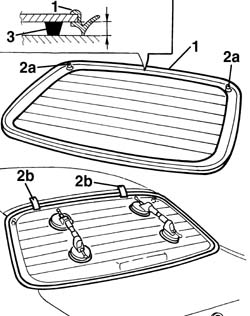
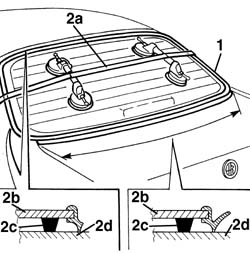
3238777 - 7035B10 Rearscreen (bonded type) WINDOW GLASS - R.R. - Includes. cleaning edges of glass and housing in bodyshell

Removing ( Refitting )  - 7025B14  Boot LID - R.R.Protect the crosshead and the body side with the suitable covers 1. Remove the perimetric gasket of the rear window 2. Apply the adhesive tape as protection of the bodywork edges in contact with the rear window
1. Use the vibration knife (1a), with the blade (1b) and cut the dope bead (1c) which block the rear window Work at the eexterior of the vehicle While cutting pay attention to the centering pins (1d) of the rear window These pins can oppose a resistance to the disconnection of the rear window

NameCountry
1aVibrating knife1.823.011.000

NameCountry
1bBlade1.823.022.000
2. Apply on the rear window the section cup toggle (2a) and with the help of a second operator remove the rear window and disconnect the electric connection (2b), the connections between the antenna central and rear window,(2c, 2d),then place the rear window on a support stand

NameConnector
2bHeated rear windscreen  P55 
Refitting ( Removing ) 1. Use the vibration knife (1a) and blade (1b), cut and level the dope string in the rear window compartment , so to leave a thickness between i 0,25 and 1 mm avoiding to scratch the paintThe thckness of the dope bead on the compartment will be the support for the new glueing

NameCountry
1aVibrating knife1.823.011.000

NameCountry
1bBlade1.823.010.000
2. Clean the rear window compartment with compressed air and degrease with heptane If necessary make the suitable retouches to the paint
1. Work on the rear window (1a) With a vibration knife and blade (1b).cut and level the dope bead so that to reduce to the minimum the thickness. It is not necessary to remove completly the remaining bead; pay attention not to damage the black silk-screen printing on the perimeter of the chrystal. In case of damage of the centring fixing pins (1c) after the disconnection, the rear winow is still usable

NameCountry
1bBlade1.823.010.000
2. Clean properly with compressed air the perimetric silk-screen printing compartment of the chrystal and degrease with heptane
Verify that the chrystal is not damagedVerify thatt the heated rear window is efficient and, if necessary, verify its electric functionality

MeasurementValue
-Absorption of stabilized thermal current (A)16 - 20
Ambient temp. (C°)20-30
1. Verify the gasket on the rear window peirimeterUse a new gasket2. In the case of breaking of the centring pins (2a), make a test assembly and center the correctly the rear window. Mark the position between the rear window and the seat with strings of adhesive tape (2b). Cut the strings of adhesive tape and remove the rear window3. With a pneumatic tire gun expel a string of dope along the perimeter of the rear window in most possible regualr way . Start the operation from the center of the inferior side and proceed without interruptions along the whole rear window perimeter
1. With the help of a second operator connect the electric connections and place the rear window in its seat after the application of the dope 2. Place the timing belt (2a) as shown in the figure and energize so that to produce a uniform pressure along the rear window so to guarantee the correct coupling between the chrystal(2b), dope (2c) and rear window compartment (2d)
Verify the absence of infiltration pointsApply soaped water with sponge along the exterior perimeter and blow from the interior with compressed air so to point out possible infiltrations Place the perimetric gasket - 7025B14  Boot LID - R.R.
Do not move the vehicle before the time forecasted by the supplier of the dope is passed by