125001759 - 7005A14 FRONT SIDE DOOR - ADJUST CENTERING AND MOULDING - INCLUDES ADAPTATION OF HINGES AND SEALS ON DOOR COMPARTMENT
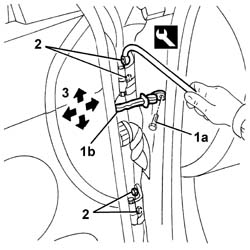
1. Undo the bolt (1a) of the door check strap (1b) and close the door again to push the check strap back in.2. Loosen the bolts using the appropriate tool. | Name | Country |
|---|---|---|
| 2 | Key | 1.822.120.000 |
| It is advisable to work on one hinge at a time. Possible adjustment movements are indicated by arrows. |
| Name | Country |
|---|---|---|
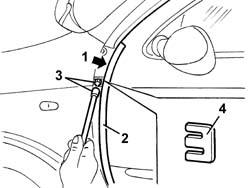
| 2 | Key | 1.822.120.000 |
| Name | Connector | |
|---|---|---|
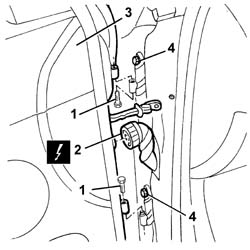
| 2 | Rear coupling for front door driver''s side | See D30 REAR COUPLING FOR /FRONT DOOR. DRIVER''S SIDE |
| Name | Connector | |
|---|---|---|
| 2 | Front passenger door rear coupling | See D31 RIGHT FRONT DOOR REAR COUPLING/. |
 | Fastening | Component | Ø | Value(daNm) |
|---|---|---|---|---|
| 4 | Bolt | FRONT SIDE DOOR HINGES | M10 | 4.5 |
| Fastening | Component | Ø | Value(daNm) |
|---|---|---|---|---|
| - | Bolt | FRONT SIDE DOOR HINGES | M6 | 1.5 |