3315166 - 7035B10 Rearscreen (bonded type) WINDOW GLASS - R.R. - Includes. cleaning edges of glass and housing in bodyshell


 | Name | Country |
|---|---|---|
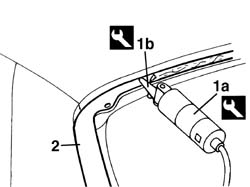
| 1a | Vibrating knife | 1.823.011.000 |
| Name | Country |
|---|---|---|
| 1b | Blade | 1.823.022.000 |
 | Name | Connector |
|---|---|---|
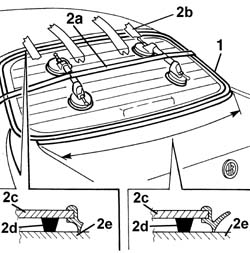
| 2b | Heated rear windscreen | P55 |
| Name | Connector |
|---|---|---|
| 2c | Heated rear windscreen | P55 |
| Name | Connector |
|---|---|---|
| 2d | Heated rear windscreen | P55 |

| Take care not to damage the black screen printing around the edge of the window. |
| Name | Country |
|---|---|---|
| 1a | Vibrating knife | 1.823.011.000 |
| Name | Country |
|---|---|---|
| 1b | Blade | 1.870.691.000 |

| Name | Country |
|---|---|---|
| 1a | Vibrating knife | 1.823.011.000 |
| Name | Country |
|---|---|---|
| 1b | Blade | 1.870.691.000 |