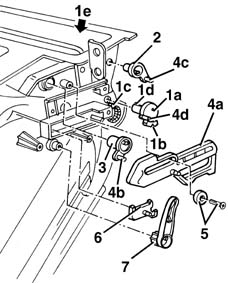
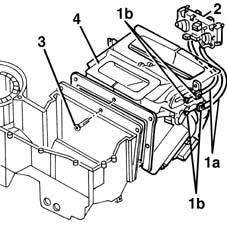
2891778 - 5020A24 heater box - dismantle and rebuild at bench

Removing ( Refitting ) 1. Disconnect the electrical connections (1a, 1b, 1c, 1d, 1e).

NameConnector
1aInterior compartment air electric fan relay  J35 

NameConnector
1bClimate control fan control  H81 

NameConnector
1cAir conditioner/heater control light  G45 

NameConnector
1dAir fan adjustment resistance  O30 

NameConnector
1ePassenger compartment ventilation fan  N85 
2. Disconnect the wiring from the retaining bands.3. Remove the complete wiring.
1. Disconnect the transmission cable from the lever.2. Undo the bolts.3. Remove the inlet casing.4. Undo the bolts.5. Remove the cover.6. Move the seal.
1. Working through the opening (1a), release the retainers (1b) and remove the lever (1c).2. Extract the lever.3. Extract the flap.4. Recover the bush.
1. Undo the bolts.2. Release the relay.3. Remove the shield.4. Undo the bolt.5. Remove the plate (5a), the pipes (5b) and the seals (5c).6. Extract the heater.
1. Disconnect the transmission cables (1a) from the retainers (1b).2. Recover the controls mounting.3. Undo the bolts.4. Remove the heater casing.
1. Lift up the retainer (1a) and remove the lever (1b).2. Recover the cursor.3. Undo the bolt and recover the washer.4. Remove the lever.5. Press the retainer (5a) in the direction of the arrow and remove the lever (5b).6. Press the retainer (6a) in the direction of the arrow and remove the lever (6b).7. Working through the opening (7a), release the retainer (7b) and remove the lever (7c).
1. Undo the bolts.2. Separate the two halves of the heater casing.3. Recover the four flaps.
1. Undo the bolt.2. Release the retainer.3. Rotate the fan in an anti-clockwise direction and extract it.4. If necessary, press the anti-vibration rubber mountings (4a) and separate the fan (4b) from the support (4c).
1. Undo the bolts.2. Remove the resistance.
Refitting ( Removing ) Check that the components are not damaged.
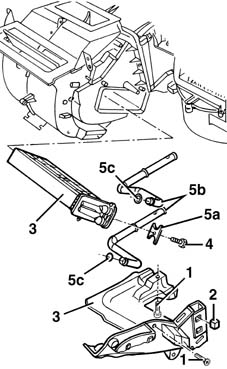
Lubricate the various moving parts using vaseline.
Position the resistance and fix it using the bolts.If removed, place the fan in the housing engaging the rubber anti-vibration mountings.Insert the fan and turn it in a clockwise direction and fix it using the bolt.Position the four flaps.Join the two halves of the heater casing and fix them using the bolts.1. Refit the lever (1a), making sure that the tooth (1c) engages in the notch (1b), then engage the retainer (1d) in the housing visible from the compartment (1e).2. Refit the lever and engage the retainer.3. Refit the lever and engage the retainer.4. Position the lever (4a) returning the pins (4b, 4c, 4d) to their housings.5. Position the washer and tighten the bolt.6. Position the cursor.7. Refit the lever and engage the retainer.
Position the heater casing and fix it using the bolts.Position the controls mounting and connect the transmission cables to the retainers.Insert the heater.Position the new seals, the pipes and the plate on the heater and then fix them using the bolt.Position the shield and fix it using the bolts.Secure the relay.1. Position the bush.2. Refit the flap.3. Fit the lever in place.4. Fit the lever (4a) in place, engaging the retainers (4b) in the housing visible from the compartment (4c).
Position the seal.Position the cover and fix it using the bolts.Positin the inlet casing and fix it using the bolts.Connect the transmission cable to the recirculation flap lever.Position the wiring.Connect the electrical connections and secure the wiring using the retaining bands.