3025791 - 7035C52 (One), side WINDOW left or right - R.R.

Removing ( Refitting ) Fold over the rear seat backrests. - 7040L40  front compartment scuff strip - r r (left and right sides) - 7050A22  rear seat cushion - r+r - 7040H50  rear panel - r r (left and right sides) - 7040H38  central pillar upper element - r r (left and right sides) - 7040G30  boot light bulb holder - r r - 7040H42  rear pillar trim - r r (left and right sides)1. Apply a double layer of adhesive tape to protect the edges of the bodywork along the entire perimeter of the window.
The bead of sealant for the side window can be cut using either harmonic wire or the vibrating knife; both methods are described below.To cut the bead using harmonic wire, proceed as follows.1. Cut a section of harmonic wire about 50 cm long then, using pliers, insert one end (1a) of the harmonic wire through the bead of sealant (1b) which secures the window (1c).2. Secure the end (1b) of the wire to the appropriate retaining tool (2a) located inside the car. Secure the end (2b) of the wire to the traction handle (2c) located outside the car.3. The operator inside the car must keep the end of the tool (2a) on the bead of sealant (3a) at about 30 cm from the point of passage of the wire. The other operator outside the car must pull the handle (2c), following the outline fo the window, and cut the bead of sealant (3a). Repeat the operation in sections of about 30 cm, until the whole of the bead of sealant (3a) is cut. During cutting, be careful with the window's centring pins (3b).
To cut the bead using the vibrating knife, proceed as described below.1. Using a vibrating knife (1a) with blade (1b) and cut the sealant (1c) along the top, rear and bottom of the windscreen, operating from outside the car. During cutting, be careful with the window's centring pins (1d).2. Remove the blade stop in and cut the sealant along the front of the window, working from outside the car.
1. Fit the suction handles to the window, then remove it.
Refitting ( Removing ) 1. Using a suitable tool, cut and smooth off the bead of sealant in the side window frame, so as to leave a thickness of between 0.25 and 1 mm, without scratching the paintwork. The sealant left in the housing will act as a backing for the new bond.2. Clean the side window seating carefully with compressed air and thoroughly degrease with heptane. If glueing takes place 60 minutes after cutting and smoothing the bead of sealant, treat the sealant surface with the specific activator and wait 15 minutes before fixing the windscreen.

TypeComponentNameQty.
2PUR activatorWINDOW HOUSING--
Touch up the paintwork if necessary.
1. Using a suitable tool, cut and smooth off the bead of sealant on the window so as to reduce its thickness to a minimum. The remaining sealant does not have to be removed completely; take care not to damage the black screen printing around the edge of the window.2. Carefully clean with compressed air the printed area around the edge of the window and thoroughly degrease with heptane. Check that the window is undamaged. Check that the seals (2a) and (2b) are not damaged, otherwise they should be replaced, after cleaning and thoroughly degreasing the glueing area. It is not necessary to insert new centring pins (2c). If glueing takes place 60 minutes after cutting and smoothing the bead of sealant, treat the sealant surface with the specific activator and wait 15 minutes before fixing the windscreen.

TypeComponentNameQty.
2PUR activatorFIXED SIDE WINDOW.--
1. Remove the adhesive tape from the edges of the bodywork along the perimeter of the side window.2. Test fit the window and centre it perfectly, with the side door closed.3. Once the window has been centred, mark the reciprocal positions of the window and seating with strips of adhesive tape.4. Cut the trips of adhesive tape and remove the window.5. Use an air gun to extrude a bead of sealant arond the edge of the windscreen as evenly as possible.

TypeComponentNameQty.
5Window bonding sealantFIXED SIDE WINDOW.Product n. 71711976-
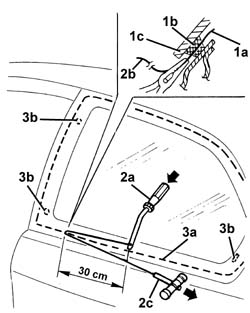
Begin applying the sealant from the middle of the lower edge and continue without breaks around the entire edge of the window.
1. Fit the window in its seating immediately after applying the sealant and bed it in position.2. Fit the belt (2a) as shown in the figure and tension it so as to apply even pressure over the entire window, in order to ensure a perfect match between window (2b), sealant (2c) and window frame (2d).
Before refitting the interior components of the car, check that there are no leaks by carrying out a water test. - 7040H42  rear pillar trim - r r (left and right sides) - 7040G30  boot light bulb holder - r r - 7040H38  central pillar upper element - r r (left and right sides) - 7040H50  rear panel - r r (left and right sides) - 7050A22  rear seat cushion - r+r - 7040L40  front compartment scuff strip - r r (left and right sides)
Wait six hours before moving the car.