3025433 - 5040C24 air conditioner box - dismantle and rebuild at bench

Dismantling ( Reassembling )  - 5040D90  air conditioner system wiring bundle - r r1. Undo the bolts fixing the shield for the expansion valve.2. Remove the shield.
1. Unscrew the nuts.2. Remove the pipe connector.3. Unscrew the bolts4. Remove the expansion valve.5. Recover the gaskets.
Do not reuse the seals when refitting.
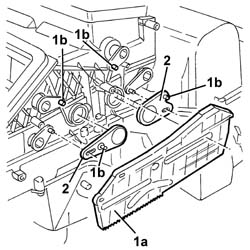
1. Undo the fixing bolts and remove the left air mixture motor (1a) after having released the intake (1b).2. Undo the fixing bolts and remove the air distribution motor (2a) after having released the toothed wheel (2b) from the cam rack.3. Undo the fixing bolts and remove the right air mixture motor (3a) after having released the intake (3b).4. Undo the fixing bolts and remove the air recirculation and intake motor (4a) after having release the intake (4b).
1. Unscrew the bolt.2. Rotate the air recirculation and intake assembly and remove it.
1. Unscrew the bolts.2. Remove the protection for the cam and the levers.
1. Remove the cam (1a) releasing it from the lever pins (1b).2. Remove the idler levers.
1. Rotate the upper air mixture temperature sensors in an anti-clockwise direction and extract them.2. Undo the bolts fixing the air intake assembly with flaps.3. Remove the air intake assembly with flaps.
1. Release the upper cover retaining springs.2. Undo the bolts fixing the upper cover.3. Remove the upper cover.
1. Remove the evaporator.2. Remove the filter elements.3. If necessary, remove the air mixture flaps (3a), lifting them in the join area (3b) until they are released.
1. Rotate the lower air mixture temperature sensors in an anti-clockwise direction and extract them.2. Undo the bolts fixing the lower duct.3. Remove the lower duct.
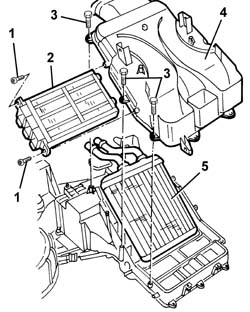
1. Undo the bolts securing the additional heater (JTD version only).2. Remove the additional heater (JTD version only).3. Undo the bolts fixing the lower cover.4. Remove the lower cover.5. Remove the heater.
1. Undo the bolt fixing the fan.2. Rotate the fan and extract it.3. Unscrew the bolts4. Extract the speed governor.5. If necessary, undo the bolts (5a) and remove the cover (5b) for the filter elements, after having released it from the retainer (5c).
Reassembling ( Dismantling ) Check that the components are not damaged.
Lubricate the various moving parts using Vaseline.
If removed, position the cover for the filter elements, then secure it using the bolts.Position the speed governor and secure it using the bolts.Fit the fan and rotate it, then secure it using the bolt.Fit the heater in position.Fit the lower cover and secure it using the bolts.1. Fit the additional heater (1a) and engage the retainers (1b) in their seatings (1c) in the casing (JTD version only).2. Tighten the fixing bolts (JTD version only).
Fit the lower duct and secure it using the bolts.Fit and rotate the lower air mixture temperature sensors.If removed, fit the air mixture flaps.1. Fit the filter elements (1a) in position. The reference arrows (1b) should be facing as illustrated in the diagram (in the direction of the air flow).
Fit the evaporator in position.Place the upper cover in position and secure it using the bolts and the retaining springs.Fit and rotate the upper air mixture temperature sensors.Position the air intake assembly with flaps and secure it using the bolts.Position the idler levers.Place the cam in position attaching it to the lever pins.Place the protection for the cam and the levers in position, then secure it using the bolts.Position and rotate the air recirculation and intake assembly and secure it using the bolt.Fit the air recirculation and intake motor attaching it to the intake then secure it using the bolts.Fit the right air mixture motor attaching it to the intake and cams, then secure it using the bolts.Fit the air distribution motor engaging the toothed wheel with the cam rack, then secure it using the bolts.Fit the left air mixture motor engaging it with the attachment, then secure it using the bolts.Position the new gaskets on the expansion valve, then secure it using the bolts.Position the pipe connector and secure it using the nuts.Position the shield and fix it using the bolts - 5040D90  air conditioner system wiring bundle - r r