3025999 - 1028H60 piston, pin set - replace
1. Remove the circlips.2. Remove the pins (2a) and separate the connecting rods (2b) from the pistons (2c).3. Remove the piston rings (3a) from the pistons using a suitable tool (3b).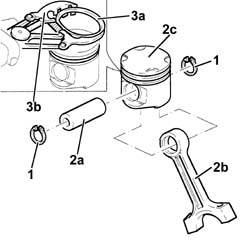
| The arrows in the diagram show the areas from where material can be removed in order to equalize the weight. |
 | Measurement | Value | |
|---|---|---|---|
| - | Maximum difference in weight between connecting rods (g.) | ± 5 |
| The arrows in the diagram show the areas from where material can be removed in order to equalize the weight. |
| Measurement | Value | |
|---|---|---|---|
| - | Maximum difference in weight between pistons (g.) | ± 5 |

| Fit the piston rings on the piston so that the word TOP stamped on them is turned toward the piston crown. |
| From September 2003, piston rings with a modified profile will be used. The piston ring for the 1st groove and the piston ring for the 2nd groove are the same thickness (1.19 mm); follow the diagram shown below to fit them correctly. |
