3025480 - 5505A10 electrical junction unit - r+r
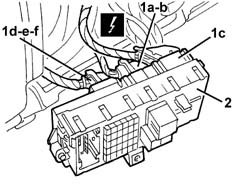
 | Name | Connector |
|---|---|---|
| 1a | Junction unit under dashboard | B2A |
| Name | Connector |
|---|---|---|
| 1b | Junction unit under dashboard | B2B |
| Name | Connector |
|---|---|---|
| 1c | Junction unit under dashboard | B2C |
| Name | Connector |
|---|---|---|
| 1d | Junction unit under dashboard | B2D |
| Name | Connector |
|---|---|---|
| 1e | Body computer | M1A |
| Name | Connector |
|---|---|---|
| 1f | Body computer | M1E |

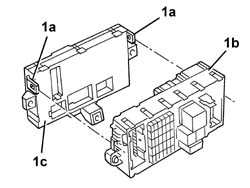
| Name | Connector |
|---|---|---|
| 1a | Junction unit under dashboard | B2F |
| Name | Connector |
|---|---|---|
| 1b | Junction unit under dashboard | B2G |
| Name | Connector |
|---|---|---|
| 1c | Junction unit under dashboard | B2H |
| Name | Connector |
|---|---|---|
| 1d | Body computer | M1B |
| Name | Connector |
|---|---|---|
| 1e | Body computer | M1C |
| Name | Connector |
|---|---|---|
| 1f | Body computer | M1D |