1. Use the chamfering maching and drill to reduce the weld spots
shown in the diagram.2. Open the metal fixing/centering tabs.3. Undo the support bolt for the bonnet telescopic support strut. 4. Using the special chisel, release and remove the side bracket
cover.
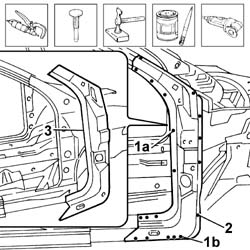
1. Using a chamfering machine, reduce the weld spots on the outer
part (1a) and the lower part (1b) of the pillar trim.2. Using a drill, reduce the spot welds shown in the diagram.3. Using a power saw, cut in the areas shown in the diagram.4. Remove the outer cover.Use a grinding wheel to remove the spot
weld residues.Straighten the edges of the panel.Apply electro-galvanizing paint to the
areas which have been ground.
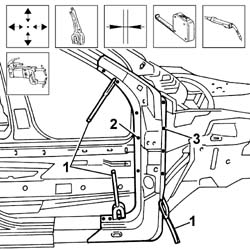
1. Using a chamfering machine, reduce the spot welds on the outer
part (1a) and the lower part (1b) of the pillar frame.2. Using a drill, reduce the spot welds shown in the diagram.3. Remove the pillar frame.Use a grinding wheel to remove the spot
weld residues.Straighten the edges of the panel.Apply electro-galvanizing paint to the
areas which have been ground.Remove the anti-corrosion treatment from
all the sections of the replacement part (inner frame and outer cover).Apply electro-galvanizing paint to the
edges in contact with the vehicle.
Refitting
(
Removing
)
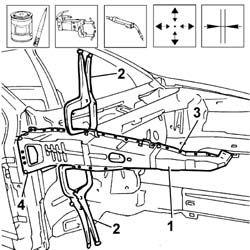
1. Position the inner frame correctly and secure it using self-locking
clamps.Check the parts are properly aligned.2. Use a spot welder to weld the areas shown in the figure.3. Fill weld the areas shown in the diagram.
1. Correctly position the pillar outer cover and secure it using
self-locking clamps.Check the parts are properly aligned.2. Use a spot welder to weld the areas shown in the figure.3. Fill weld the areas shown in the diagram.4. Carry out seam welding in the areas shown in the diagram.
Clean the areas affected by
the welding.Check the welded parts are correctly positioned.Apply electro-galvanizing paint to the
areas which have been ground.Clean the area cut and apply electro-galvanizing
paint.1. Position the side bracket cover.2. Position the self-locking clamps.3. Spot weld the points shown in the diagram.4. Use a MIG welder to seam weld the areas shown in the figure.