194001001 - 7035A18 WINDSCREEN GLASS - R.R INCLUDING CLEANING HOUSING

Removing ( Refitting ) Disconnect the negative battery terminal.
DescriptionConnector
BATTERY    See A001 BATTERY
    Op. 7210E22 R.R. WINDSCREEN BASE TRIM    Op. 7035A54 WINDSCREEN BASE LOWER SUPPORT (ONE), LEFT OR RIGHT FOR WINDSCREEN PROTECTIVE GRILLE ATTACHMENT - R.R.(Both sides)    Op. 7040H30 FRONT PILLAR TRIM (ONE), LEFT OR RIGHT - R.R.    Op. 7065C68 INTERIOR REAR VIEW MIRROR - R+RFor versions where fitted:    Op. 7065C59 INTERIOR REAR VIEW MIRROR WITH AUTOMATIC ANTIGLARE DEVICE - R R    Op. 5050B70 RAIN/DUSK SENSOR - R.R.For all versions:1. Apply adhesive tape to protect the edges of the bodywork, along the side and upper edges of the windscreen glass.2. Completely lower the windscreen glass retaining mounting pins.
1. Using a vibrating knife (1a) and blade with an appropriate profile (1b), cut the bead of sealant (1c).
1. After having cut the bead of sealant, apply suction pads to the windscreen and then, with the assistance of a second mechanic, remove the windscreen from the vehicle.
Refitting ( Removing )
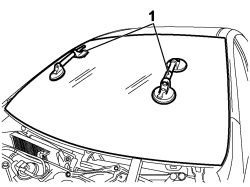
The windscreen glass cannot be refitted because whilst cutting the sealant the windscreen seal will be irreparably damaged.
1. Using suitable equipment, cut and level the bead of sealant in the windscreen housing leaving a thickness of between 0.25 and 1 mm, taking care not to scratch the paintwork. The thickness of the sealant remaining in the housing will act as a support for the new bonding.2. Thoroughly clean the windscreen housing using an air jet and degrease fully using heptane. When bonding, 60 minutes after the bead of sealant has been cut and levelled, the surface of the actual sealant must be treated using the special activating product and it is necessary to wait for 15 minutes before fitting the windscreen.
1. Release the retaining mountings (1a) and completely remove all the pins (1b), then refit the mountings.2. Remove the adhesive tape from the edges of the bodywork and along the side and upper edges of the windscreen housing.3. Carry out a test fitting and centre the windscreen perfectly leaving an empty space of between 4 and 5 mm between the upper edge of the windscreen and the edge of the windscreen housing.4. When the windscreen has been centered, mark the position of the windscreen in relation to the housing using strips of adhesive tape.5. Cut the strips of adhesive tape and remove the windscreen.
- Using a spray gun apply a bead of sealant along the entire perimeter of the rearscreen as evenly as possible.
ComponentTypeDescriptionClassificationQty.Validity
Windscreen glassWindscreen sealantProduct n° 71711976--
1. Place the windscreen in the housing, with the assistance of a second mechanic, straight after applying the sealant and let it bed in.2. Position the belt (2a), as illustrated, and tension it so that even pressure is exerted on the entire windscreen to ensure that the matching between the glass (2b), sealant (2c) and windscreen housing (2d) is correct.
(Both sides)    Op. 7040H30 FRONT PILLAR TRIM (ONE), LEFT OR RIGHT - R.R.    Op. 7210E22 R.R. WINDSCREEN BASE TRIM    Op. 7065C68 INTERIOR REAR VIEW MIRROR - R+RFor versions where fitted:    Op. 7065C59 INTERIOR REAR VIEW MIRROR WITH AUTOMATIC ANTIGLARE DEVICE - R R    Op. 5050B70 RAIN/DUSK SENSOR - R.R.For all versions:Connect the negative battery terminal.
DescriptionConnector
BATTERY    See A001 BATTERY