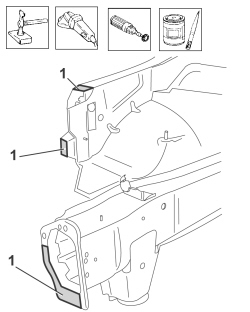
- Use the rotary brush and remove the paint to access the spot welds.1. Use the chamfering machine on the spot welds shown in the diagram.2. Undo the bolts fixing the crossmember.- Use the hammer and chisel and remove the spot welds chamfered previously.- Remove the headlamp set front wing beam.
- Straighten the edges of the bodyshell using a mallet and dolly block.- Remove the spot weld residues using a disc grinder.- Use a rotary brush to clean the areas treated previously.1. Apply electro-galvanizing paint.
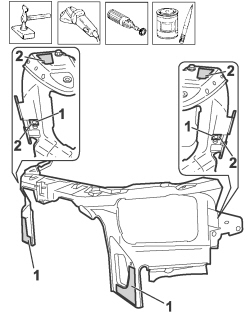
- Remove the anti-corrosion treatment using the rotary brush from both the inside and the outside of the replacement part shown in the diagram.1. Make the holes shown in the diagram using a drill.2. Apply electro-weldable paint to the points treated previously.
Refitting
(
Removing
)
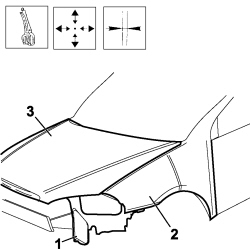
1. Position the crossmember correctly on the vehicle and secure it using a few bolts.2. Fit both wings provisionally.3. Provisionally fit the bonnet.- Bring the sacrificial beam up the vehicle and check the fastening holes correspond- Check the alignment and the surrounding gaps.- Remove the components used for the adjustment.
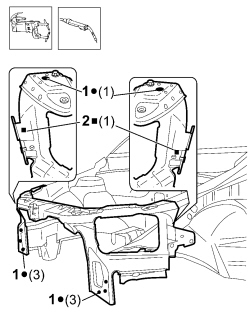
1. Use a spot welder in the areas shown in the diagram.2. Use the MIG welder to fill weld at the points shown in the diagram.
- Correct any distortions to the panel using a hammer and dolly block.- Use a disc grinder to level and remove the welding.- Use a rotary brush to clean the areas welded previously.1. Apply anti-oxidant protection to the areas involved in the welding.- Seal the join lines between the replacement part and the vehicle.- Proceed with the painting stage. Op. 7210A18 R.R FRONT CROSSMEMBER Op. 7210E18 R.R. FRONT WING