194001232 - 7210B57 RR CROSS MEMBER UNDER REAR SEAT
Removing
(
Refitting
)
- Check that the components connected are not distorted by checking the bodyshell alignment measurements using suitable equipment (gauges, templates or jigs).- Straighten the body as necessary.
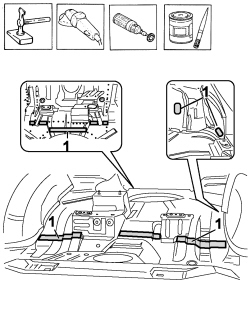
1. Remove sealant using a warm air blower, scraper and steel brush.
- Use the rotary brush to clean the edges of the panel to highlight the spot welds.1. Use the drill and chamfer the spot welds in the areas shown in the diagram.2. Use an oxyacetylene torch and steel brush to remove the soldering shown in the figure.- Use the hammer and chisel and remove the spot welds chamfered previously.- Remove the crossmember beneath the vehicle seat.
- Correct any distortions to the panel using a profiled block and mallet.- Remove the spot weld residues using a disc grinder.- Use a rotary brush to clean the areas treated previously.1. Apply electro-galvanizing paint.
1. Use a rotary brush to remove the corrosion-proofing at the points indicated in the figure from the inside and outside of the part crossmember.2. Drill the holes as shown in the figure.- Apply electro-weldable paint to the edges treated previously.
Refitting
(
Removing
)
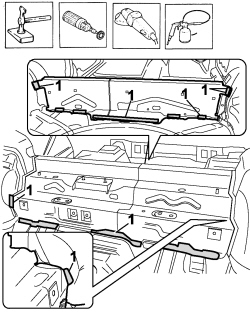
- Position the part crossmember correctly on the vehicle.- Tack weld the crossmember using the MIG welder.1. After checking the crossmember is correctly positioned, fill weld all the other holes shown in the figure.2. Use an oxyacetylene torch to solder at the points shown in the figure.
- Correct any distortions to the panel using a profiled block and mallet.- Use a disc grinder to level the welds.- Use a rotary brush to clean the areas welded previously.1. Apply anti-oxidant protection to the areas involved in the welding.
1. Apply sealant to the areas illustrated in the diagram.- Use a steel brush to remove the underbody protection, burnt following welding, from the outer edge of the floor.- Apply rustproofing protection.- Apply underbody protection.- Proceed with the painting stage.