194002122 - 1004D20 POWER UNIT (AUTOMATIC TRANSMISSION) REMOVED, REMOVE AND RE-BUILD (AUTOMATIC TRANSMISSION)

Removing
(
Refitting
)
1. Undo the bolts (1a) and remove the left side engine support flexible mounting (1b).
1. Undo the bolts (1a) and remove the bracket on the gearbox for the lower reaction rod (1b).
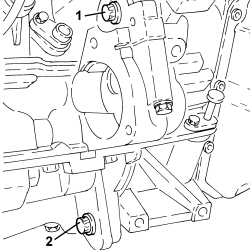
1. Open the access cover for the electrical connection.2. Undo the nut (2a) and disconnect the electrical connections (2b) from the starter motor.3. Undo the bolts (3a) and remove the starter motor (3b).
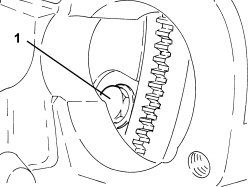
1. Rotate the crankshaft to gain access to and undo the three bolts fixing the torque converter to the engine flywheel.
1. Undo the bolt fixing the automatic gearbox to the engine block on the left side.2. Undo the left bolt fixing the crankcase sump to the automatic gearbox.
1. Undo the upper bolt illustrated in the diagram securing the automatic gearbox to the engine crankcase.
1. Undo the bolts fixing the automatic gearbox to the engine block on the right side.2. Undo the right bolt fixing the crankcase sump to the automatic gearbox.
- Support the automatic gearbox using a hydraulic lift.1. Undo the remaining upper bolt (1a) and remove the automatic gearbox (1b).
1. Remove the torque converter. | Take care because the torque converter is full of oil. |
Refitting
(
Removing
)
- Check and clean the threads on the torque converter housing the bolts securing it to the engine flywheel.- Check that the automatic gearbox centering bushes are correctly housed in the engine crankcase.- Lubricate the centering housing for the torque converter with a thin layer of lubricating grease.- Check the torque converter centering pin. check for rust, clean, if necessary, and lubricate with a thin layer of lubricating grease.- Place the torque converter back in its housing.
1. Check that the torque converter is correctly positioned by using a sliding gauge to check that the distance between the torque converter connector threades and the matching surface of the automatic gearbox is about 16 mm.
- Place the automatic gearbox back in its housing using a hydraulic lift.- Tighten the bolts securing the automatic gearbox to the specified torque.| Component | Fastening | dia | Value (daNm) | Validity |
|---|
| Automatic transmission | Bolt | M12 | (engine side) 4.8 - 7.2 | 2.2 CAE |
1. Place the three new bolts securing the torque converter to the engine flywheel back in their housings and tighten them to the recommended torque. | Use bolts of the same length as the ones that were removed. |
| Component | Fastening | dia | Value (daNm) | Validity |
|---|
| Torque converter | Bolt (pretreated to be replaced) | M10 | (engine flywheel side) 4.5 - 5.5 | 2.2 CAE |
1. Place the starter motor (1a) in its housing and secure it tightening the bolts (1b) to the recommended torque.| Component | Fastening | dia | Value (daNm) | Validity |
|---|
| Starter motor | Bolt | M10 x 1.5 | (gearbox side) 3.5 - 4.5 | 2.2 |
2. Connect the electrical connections (2a) to the starter motor and secure them using the nuts(2b).3. Close the access cover for the electrical connections.
1. Refit the lower reaction rod bracket (1a) in its seat on the gearbox and secure it by tightening the bolts (1b) to the recommended torque.| Component | Fastening | dia | Value (daNm) | Validity |
|---|
| Bracket on gearbox for lower reaction rod | Bolt | M12 | (gearbox side) 7.5 - 8.5 | |
1. Place the left side engine support flexible mounting (1a) in its housing and secure it tightening the bolts (1b) to the recommended torque.| Component | Fastening | dia | Value (daNm) | Validity |
|---|
| Flexible mounting for left side engine support | Bolt | M12 | (gearbox side) 7.5 - 8.5 | |