194002221 - INTRODUCTION - ON BOARD INSTRUMENTS
Specifications
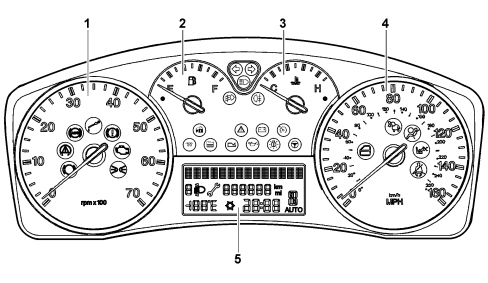
The panel is installed behind the steering wheel.Its position guarantees maximum visibility/legibility of the information for the driver in all vehicle usage conditions (day/night) without reflections, distortions or double images.The panel is available on the Comfort versionView of assembly
Composition:
The panel contains 4 analogue gauges:- Electronic speedometer- Electronic rev counter- Fuel level (with insufficient fuel level warning light)- Engine coolant temperature gauge (with overheating warning light)All the indicators are moved by a stepping motor.There is a positive three line alphanumerical display:The top line has 14 dot matrix characters (7x5) for the display of:- Date- Trip computer data (processed by the control panel);- Set-up menu with messages for settings/adjustments;- Messages about: activation of functions / service / failure / warning;- Radio/telephone information repetition;The bottom two lines in segments are for displaying:- Milometer;- Clock;- Outside temperature and ICE DANGER symbol- Headlamp alignment corrector reading;- "Return to workshop" symbol (spanner);- Automatic transmission information (display of gear engaged and AUTO symbol);There is a buzzer with the possibility of managing signals of different intensity for carrying out the following functions:- Alarm/warning/danger signals- Doors open with the vehicle moving- Handbrake applied with vehicle moving- Driver''s/passenger seat belt not fastened- Driver''s/passenger seat belt not fastened- Fuel reserve- Button pressing roger beep- Automatic transmission signalling- Parking sensor signalling- Engine coolant temperature- Insufficient engine oil pressure/level- EOBD failure- EBD / ABS / ESP- TPMS (puncture only)- AIR-BAG / SBR- Automatic transmission fluid overheating- Electric Steering- DPF- Key (TEG) not recognizedThe instrument panel interfaces with:- 5 external buttons fitted on the dashboard: “C.A.F.+”, “C.A.F. –“, “Mode”, “Mode+”, “Mode–“.- TRIP button on the right steering column switch unit lever.A three line transreflective technology alphanumerical display is located in the centre.
WARNING LIGHTS IN INSTRUMENT PANEL
The warning lights in the instrument panel are shown in the diagram and in the table below:
| REF. | WARNING LIGHT | COLOUR |
|---|---|---|
| 1 | Fuel reserve | amber |
| 2 | Engine coolant temperature | red |
| 3 | Gearbox failure (optional on Auto Trans version only) | red |
| 4 | Heater plugs (for diesel versions only) | amber |
| 5 | Water in diesel filter (for diesel versions only) | amber |
| 6 | Defective operation of braking system (insufficient brake fluid level/handbrake applied) | red |
| 7 | ABS failure | amber |
| 8 | Side lights | green |
| 9 | Main beam headlamps | blue |
| 10 | Front fog lights | green |
| 11 | Rear fog lamps | amber |
| 12 | Right direction indicators | green |
| 13 | Left direction indicators | green |
| 14 | Lights failure | amber |
| 15 | Battery charge | red |
| 16 | Seat belt locking | red |
| 17 | Insufficient fluid level | red |
| 18 | Engine management system failure (EOBD) | amber |
| 19 | Air Bag failure | red |
| 20 | ESP system failure | amber |
| 21 | Vehicle protection system failure | amber |
| 22 | Doors not properly shut | red |
| 23 | Passenger Air Bag manual disabling | red |
| 24 | Cruise control on (optional) | green |
| 25 | General failure | amber |
| 26 | Engine oil pressure | red |
| 27 | Rear side bag manual disabling (optional) | amber |
| 28 | Electric steering failure | red |
| 29 | Brake pad wear | red/amber |
Rear view of instrument panel
The rear view of the instrument panel and the pin out is illustrated below.
| PIN | FUNCTION |
|---|---|
| 1 | INT |
| 2 | +30 |
| 3 | B - CAN A |
| 4 | B - CAN B |
| 5 | Reference signal for headlamp alignment actuators |
| 6 | + dipped headlamps signal for headlamp alignment corrector |
| 7 | Earth |
| 8 | Negative signal from trip computer key on steering wheel stalk unit |
| 9 | Signal from controlson PCS: “Mode -” |
| 10 | I.E./EOBD failure warning light negative signal from NCM |
| 11 | Signal from PCS headlamp alignment correcter up, headlamp alignment correcter down |
| 12 | Dimmed positive command for switch panel lighting LED (n.c.) |
| 13 | Negative signal from spare warning light (n.c.) |
| 14 | n.c. |
| 15 | n.c. |
| 16 | Signal from controlson PCS: “Mode”, “Mode +” |
| 17 | Engine oil level sensor power supply (n.c.) |
| 18 | Signal from engine oil level sensor (n.c.) |
Operation
Display at key onThe information in the standard display is:- date (on the 14 character alphanumerical line)- clock- milometer- headlamp alignment corrector information- outside temperature- ice symbol (in the case of ice danger)- automatic transmission readings (where present)


Set-up menu display
Access to the menu screenThe buttons for the set-up are present in the controls, pressing "MODE" activates the ambient menu.The + and - buttons are used for navigating inside the menu.The menu set-up functions can be selected using the "MODE" / "+" / "-" buttons which should only be activated with the vehicle stationary with the exception of the following functions: "SPEED LIMIT EXCEEDED" (selecting activation/deactivation of speed limit and selecting speed limit level).Not all the functions can be activated during the fault message display cyclesThe operation should be the sequential type as described below."MODE" buttonsWith 1 brief press:- if the vehicle speed is less than 4 km/h: activation of the "complete" set-up menu and shown on the display;- if the vehicle speed is above the 4km/h parameter: activation of the "reduced" set-up menu;- confirmation of the selected function;- confirmation of the setting/modification and return to the main menu screen (same option).With 1 long press and not on the release of the button:- memorizing of the modifications confirmed with the short press and return to the standard screen (or the screen activated before the "MODE" button was pressed briefly). "+" / "-" keys- Selection of functions present in the set-up menu.- Setting/adjustment of functions present in the set-up menu;The setting of the functions (e.g. clock adjustment) takes place in increasingly shorter steps depending on the time the button is kept pressed.TimeoutIf no operation is carried out for a period of 60 seconds, the standard screen is restored (or the screen activated before the "MODE" button was pressed).The following functions can be displayed whilst the vehicle is being driven by pressing the "MODE" button:- Introductory words for opening the menu- Selecting speed limit activation/deactivation- Selecting speed limit level- Dusk sensor sensitivity level adjustment- Menu exitThe following functions can be displayed whilst the vehicle is stationary by pressing the "MODE" button:- Introductory words for opening the menu- Selecting speed limit level- Selecting speed limit activation/deactivation- Dusk sensor sensitivity level adjustment- TRIP B activation / deactivation.-- Clock adjustment- Hour mode (12h / 24h)- Date adjustment- Activation/deactivation of boot release together with unlocking of all the doors- Activation/deactivation of unlocking of front door only- Activation/deactivation of automatic locking of doors + boot above 20 km/h- Setting unit of measurement for distances- Setting unit of measurement for fuel consumption- Language setting- Volume of buzzer for alarms/failures/warnings- Button pressing buzzer volume (roger beep)- Reactivation of buzzer for SBR signalling- Service interval display (km/miles/days)- Menu exitLighting dimmer
The driver can adjustment the brightness inside the passenger compartment (lighting for graphics/gauges/control panel display and climate control) by pressing the "MODE +" and "MODE -" buttons. The lighting brightness cannot however be reduced to zero.The effect of the adjustment of the brightness (after pressing the buttons) is immediately visible.The dimming value is transmitted by the NQS via the CAN to allow the brightness value to be sent to the other Nodes.If the side lights are deactivated, the display is 100% lit up and the brightness cannot be adjusted (dimmed). The adjustment is only possible with the exterior lights on.The warning lights are not subject to adjustment/dimming (brightness always 100%).If the brightness is adjusted the first line of the display shows the message "Lighting" and the brightness adjustment symbols come on/go off.
| ... DATA ERROR - CROPPED TEXT | Ошибка данных - Текст обрезан ... |
|---|