194001226 - 7210B18 R.R. ROOF PANEL SUPPORTING CROSSMEMBER

Removing
(
Refitting
)
Op. 7210E28 R.R. ROOF PANEL- Check that the components connected are not distorted by checking the bodyshell alignment measurements using suitable equipment (gauges, templates or jigs).- Straighten the body as necessary.
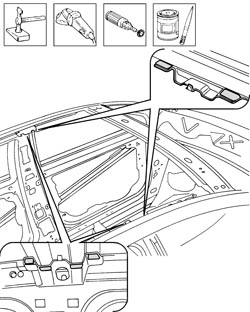
1. Use the chamfering machine on the spot welds shown in the diagram.2. Straighten the centering tab.- Use the hammer and chisel and remove the spot welds chamfered previously.3. Remove the roof supporting crossmember.
- Straighten the edges of the bodyshell using a hammer and dolly block.- Remove the spot weld residues using a disc grinder.- Use a rotary brush to clean the areas treated previously.- Apply electro-galvanizing paint.
- Remove the anti-corrosion treatment using the rotary brush from both the inside and the outside of the replacement part shown in the diagram.1. Apply electro-weldable paint to the points treated previously.
Refitting
(
Removing
)
1. Position the crossmember correctly on the vehicle and secure it using self-locking clamps.- Check that the alignment is perfect.2. Check that the centering tab is inserted in the crossmember.
3. Use a spot welder in the areas shown in the diagram.
- Correct any distortions to the panel using a hammer and dolly block.1. Attach the centering tab.- Use a rotary brush to clean the areas welded previously.2. Apply anti-oxidant protection to the areas involved in the welding.- Seal the join lines between the replacement part and the vehicle.
Op. 7210E28 R.R. ROOF PANEL