199001075 - 2110B20 MANUAL GEARBOX (5-6 SPEED) WITH DIFFERENTIAL - DISMANTLING AND REASSEMBLY - WASH AND CHECK PARTS - REPLACE SYNCHRONISERS AND INTERNAL CONTROLS IF NECESSARY
| Tool | Description | Function | Validity |
|---|---|---|---|
| 1870689000 | Mount | Gearbox support | 1.2 8v1.4 8v |
| Tool | Description | Function | Validity |
|---|---|---|---|
| 1860873000 | Gearbox support | Removing-refitting gearbox from the vehicle | 1.3 Multijet 75 CV1.3 Multijet 90 CV 5 speed1.2 8v1.4 8v1.4 16v TJet |

| Two mechanics are needed for this operation. |
| Tool | Description | Function | Validity |
|---|---|---|---|
| 1871001014 | Gearbox support | Overhaul gearbox | 1.3 Multijet 75 CV1.3 Multijet 90 CV 5 speed1.2 8v1.4 8v1.4 16v TJet |

| Use a drier to help detach the sealant. |
| Tool | Description | Function | Validity |
|---|---|---|---|
| 1847056000 | Extractor | Extracting differential output shafts | 1.2 8v1.4 8v |

| If two gears are engaged simultaneously the gear shafts will lock. |

| The positioning of the 5th speed control fork in neutral is necessary to prevent the synchronizer rollers from being lost. |
| Tool | Description | Function | Validity |
|---|---|---|---|
| 1840005400 | Extractor | Extracting 5th speed driven gearRemoving hub for 5th speed engagement sliding sleeve | 1.2 8v1.4 8v |


| Tool | Description | Function | Validity |
|---|---|---|---|
| 1840005400 | Extractor | Extracting 5th speed driven gearRemoving hub for 5th speed engagement sliding sleeve | 1.2 8v1.4 8v |

| Tool | Description | Function | Validity |
|---|---|---|---|
| 1845057000 | Extractor | Removing 5th speed drive gear bush | 1.2 8v1.4 8v |


| To remove the circlips, arrange them with their openings at the front. |


| The sealing ring and gasket must always be replaced. |


| Replace the outer and inner bushes whenever thrust bearing drive shaft play is excessive. |


| Tool | Description | Function | Validity |
|---|---|---|---|
| 1840005002 | Extractor | Removing 4th speed driven gear and rear bearingRemoving 3rd speed driven gear and 2nd speed driven gear | 1.2 8v1.4 8v1.4 16v TJet |
| Tool | Description | Function | Validity |
|---|---|---|---|
| 1840005301 | Clamps | Removing 4th speed drive gear and rear bearingRemoving main shaft front bearingRemoving bearing from differential | 1.2 8v1.4 8v |
| Tool | Description | Function | Validity |
|---|---|---|---|
| 1842133000 | Extractor | Removing 4th speed driven gear and rear bearingRemoving bearing from differential | 1.2 8v1.4 8v |

| Tool | Description | Function | Validity |
|---|---|---|---|
| 1840005002 | Extractor | Removing 4th speed driven gear and rear bearingRemoving 3rd speed driven gear and 2nd speed driven gear | 1.2 8v1.4 8v1.4 16v TJet |
| Tool | Description | Function | Validity |
|---|---|---|---|
| 1840005303 | Clamps | Removing layshaft rear bearingRemoving 3rd speed driven gear and 2nd speed driven gearRemoving 3rd and 4th speed engagement sliding sleeve hub, synchronizer ring and 3rd speed drive gear | 1.3 Multijet 75 CV1.3 Multijet 90 CV 5 speed1.2 8v1.4 8v1.4 16v TJet |

| Tool | Description | Function | Validity |
|---|---|---|---|
| 1840005002 | Extractor | Removing 4th speed driven gear and rear bearingRemoving 3rd speed driven gear and 2nd speed driven gear | 1.2 8v1.4 8v1.4 16v TJet |
| Tool | Description | Function | Validity |
|---|---|---|---|
| 1840005306 | Clamps | Removing 1st, 2nd and 3rd speed driven gearsDismantling main shaftRemoving layshaft front bearing | 1.3 Multijet 75 CV1.3 Multijet 90 CV 5 speed1.2 8v1.4 8v1.4 16v TJet |

| Tool | Description | Function | Validity |
|---|---|---|---|
| 1840005001 | Strut | Removing left differential internal driveshaftExtracting main shaft front bearingRemoving layshaft front bearing inner raceRemoving 4th speed drive gear and rear bearingRemoving 3rd and 4th speed engagement sliding sleeve hub, synchronizer ring and 3rd speed drive gearRemoving main shaft front bearing | 1.3 Multijet 75 CV1.3 Multijet 90 CV 5 speed1.2 8v1.4 8v1.4 16v TJet |
| Tool | Description | Function | Validity |
|---|---|---|---|
| 1840005301 | Clamps | Removing 4th speed drive gear and rear bearingRemoving main shaft front bearingRemoving bearing from differential | 1.2 8v1.4 8v |

| Tool | Description | Function | Validity |
|---|---|---|---|
| 1840005001 | Strut | Removing left differential internal driveshaftExtracting main shaft front bearingRemoving layshaft front bearing inner raceRemoving 4th speed drive gear and rear bearingRemoving 3rd and 4th speed engagement sliding sleeve hub, synchronizer ring and 3rd speed drive gearRemoving main shaft front bearing | 1.3 Multijet 75 CV1.3 Multijet 90 CV 5 speed1.2 8v1.4 8v1.4 16v TJet |
| Tool | Description | Function | Validity |
|---|---|---|---|
| 1840005303 | Clamps | Removing layshaft rear bearingRemoving 3rd speed driven gear and 2nd speed driven gearRemoving 3rd and 4th speed engagement sliding sleeve hub, synchronizer ring and 3rd speed drive gear | 1.3 Multijet 75 CV1.3 Multijet 90 CV 5 speed1.2 8v1.4 8v1.4 16v TJet |

| Tool | Description | Function | Validity |
|---|---|---|---|
| 1870152000 | Fitting tool | Fitting hub for 1st/2nd and 3rd/4th speed engagement sliding sleevesFitting 3rd speed driven gear | 1.2 8v1.4 8v |

| The notches in the sleeve should correspond with the springs. |

| Tool | Description | Function | Validity |
|---|---|---|---|
| 1870631000 | Fitting tool | Fitting rear bearing on main shaftFitting 4th and 5th speed driven gearsFitting 5th speed drive gear bushFitting hub for 5th speed engagement sliding sleeve | 1.2 8v1.4 8v1.4 16v |

| Tool | Description | Function | Validity |
|---|---|---|---|
| 1870152000 | Fitting tool | Fitting hub for 1st/2nd and 3rd/4th speed engagement sliding sleevesFitting 3rd speed driven gear | 1.2 8v1.4 8v |

| The notches in the sleeve should correspond with the springs. |
| Tool | Description | Function | Validity |
|---|---|---|---|
| 1870152000 | Fitting tool | Fitting hub for 1st/2nd and 3rd/4th speed engagement sliding sleevesFitting 3rd speed driven gear | 1.2 8v1.4 8v |

| Tool | Description | Function | Validity |
|---|---|---|---|
| 1870631000 | Fitting tool | Fitting rear bearing on main shaftFitting 4th and 5th speed driven gearsFitting 5th speed drive gear bushFitting hub for 5th speed engagement sliding sleeve | 1.2 8v1.4 8v1.4 16v |
| Tool | Description | Function | Validity |
|---|---|---|---|
| 1870631000 | Fitting tool | Fitting rear bearing on main shaftFitting 4th and 5th speed driven gearsFitting 5th speed drive gear bushFitting hub for 5th speed engagement sliding sleeve | 1.2 8v1.4 8v1.4 16v |

| Tool | Description | Function | Validity |
|---|---|---|---|
| 1870419000 | Fitting tool | Fitting main shaft oil seal on gearbox to engine mount | 1.2 8v1.4 8v1.4 16v |
| Tool | Description | Function | Validity |
|---|---|---|---|
| 1870007000 | Grip | Fitting differential mount bearing outer racesFitting main shaft oil seal on gearbox to engine mountFitting oil seal on differential coverFitting bearing on differential | 1.3 Multijet 75 CV1.3 Multijet 90 CV 5 speed1.2 8v1.4 8v1.4 16v1.9 Multijet1.3 Multijet 90 CV 6 speed1.4 16v TJet |


| Tool | Description | Function | Validity |
|---|---|---|---|
| 1870633000 | Fitting tool | Fitting clutch thrust bearing control linkage inner bush | 1.2 8v1.4 8v1.4 16v |


| Component | Fastening | dia | Value (daNm) | Validity |
|---|---|---|---|---|
| Manual gearbox casing differential support | Bolt | M8 | 2.0 | 1.2 8v1.4 8v1.4 16v |
| Component | Fastening | dia | Value (daNm) | Validity |
|---|---|---|---|---|
| Manual gearbox casing differential support | Bolt | M10 | 3.5 | 1.2 8v1.4 8v1.4 16v |

| Component | Fastening | dia | Value (daNm) | Validity |
|---|---|---|---|---|
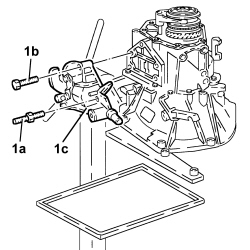
| Speed signalling control support | Bolt | M6 | 0.5 | 1.2 8v1.4 8v |


| Component | Fastening | dia | Value (daNm) | Validity |
|---|---|---|---|---|
| 5th speed engagement fork control pawl | Bolt | M6 | 1.1 ÷ 1.3 | 1.2 8v1.4 8v1.4 16v |

| Component | Fastening | dia | Value (daNm) | Validity |
|---|---|---|---|---|
| Support with fork lever for reverse gear engagement | Bolt | M8 | 1.4 ÷ 1.6 | 1.2 8v1.4 8v1.4 16v |
| Component | Fastening | dia | Value (daNm) | Validity |
|---|---|---|---|---|
| Gearbox casing | Bolt | M8 | 1.8 ÷ 2.2 | 1.2 8v1.4 8v1.4 16v |

| Component | Fastening | dia | Value (daNm) | Validity |
|---|---|---|---|---|
| Manual gearbox reverse gear idler | Bolt | M8 | 2.3 ÷ 2.8 | 1.2 8v1.4 8v1.4 16v |
| To facilitate the fitting of the rear bearing circlips, position them with the openings at the front. |

| Component | Fastening | dia | Value (daNm) | Validity |
|---|---|---|---|---|
| Main and layshaft rear bearings retaining plate | Bolt | M8 | 1.8 ÷ 2.2 | 1.2 8v1.4 8v1.4 16v |

| Tool | Description | Function | Validity |
|---|---|---|---|
| 1870631000 | Fitting tool | Fitting rear bearing on main shaftFitting 4th and 5th speed driven gearsFitting 5th speed drive gear bushFitting hub for 5th speed engagement sliding sleeve | 1.2 8v1.4 8v1.4 16v |

| Tool | Description | Function | Validity |
|---|---|---|---|
| 1870631000 | Fitting tool | Fitting rear bearing on main shaftFitting 4th and 5th speed driven gearsFitting 5th speed drive gear bushFitting hub for 5th speed engagement sliding sleeve | 1.2 8v1.4 8v1.4 16v |

| The notches in the sleeve should correspond with the springs. |

| Tool | Description | Function | Validity |
|---|---|---|---|
| 1870631000 | Fitting tool | Fitting rear bearing on main shaftFitting 4th and 5th speed driven gearsFitting 5th speed drive gear bushFitting hub for 5th speed engagement sliding sleeve | 1.2 8v1.4 8v1.4 16v |

| Component | Fastening | dia | Value (daNm) | Validity |
|---|---|---|---|---|
| Manual gearbox gear engagement unit cover | Bolt | M6 | 2.0 | 1.2 8v1.4 8v1.4 16v |

| If two gears are engaged simultaneously the gear shafts will lock. |
| Component | Fastening | dia | Value (daNm) | Validity |
|---|---|---|---|---|
| 5th speed control fork | Bolt | M6 | 1.2 | 1.2 8v1.4 8v |
| Component | Fastening | dia | Value (daNm) | Validity |
|---|---|---|---|---|
| Main and layshaft ring nuts | Ring nut | M20 | 11.8 | 1.2 8v1.4 8v |

| Tool | Description | Function | Validity |
|---|---|---|---|
| 1874140005 | Pair of heads | Staking ring nuts securing main and layshaft 5th speed | 1.2 8v1.4 8v1.4 16v |
| Tool | Description | Function | Validity |
|---|---|---|---|
| 1874140001 | Calliper | Staking ring nuts securing main and layshaft 5th speed | 1.2 8v1.4 8v1.4 16v |

| Component | Fastening | dia | Value (daNm) | Validity |
|---|---|---|---|---|
| Rear cover | Bolt | M6 | 0.5 | 1.2 8v1.4 8v1.4 16v |

| Tool | Description | Function | Validity |
|---|---|---|---|
| 1895655000 | Mount | Determining thickness of differential bearing scraper rings | 1.3 Multijet 75 CV1.3 Multijet 90 CV 5 speed1.2 8v1.4 8v1.4 16v1.4 16v TJet |

| Tool | Description | Function | Validity |
|---|---|---|---|
| 1895655000 | Mount | Determining thickness of differential bearing scraper rings | 1.3 Multijet 75 CV1.3 Multijet 90 CV 5 speed1.2 8v1.4 8v1.4 16v1.4 16v TJet |
| 0.12 corresponds to the recommended interference for the bedding in and pre-loading of the differential bearings. |


| Tool | Description | Function | Validity |
|---|---|---|---|
| 1870629000 | Fitting tool | Fitting oil seal on differential cover | 1.2 8v1.4 8v1.4 16v |
| Tool | Description | Function | Validity |
|---|---|---|---|
| 1870007000 | Grip | Fitting differential mount bearing outer racesFitting main shaft oil seal on gearbox to engine mountFitting oil seal on differential coverFitting bearing on differential | 1.3 Multijet 75 CV1.3 Multijet 90 CV 5 speed1.2 8v1.4 8v1.4 16v1.9 Multijet1.3 Multijet 90 CV 6 speed1.4 16v TJet |
| The sealing ring and gasket must always be replaced. |

| Component | Fastening | dia | Value (daNm) | Validity |
|---|---|---|---|---|
| Manual gearbox differential seal flange | Bolt | M8 | 2.0 | 1.2 8v1.4 8v |

| The oil seal must always be replaced. |
| Tool | Description | Function | Validity |
|---|---|---|---|
| 1870630000 | Fitting tool | Fitting gearbox casing differential support oil seal | 1.2 8v1.4 8v |
| Tool | Description | Function | Validity |
|---|---|---|---|
| 1870007000 | Grip | Fitting differential mount bearing outer racesFitting main shaft oil seal on gearbox to engine mountFitting oil seal on differential coverFitting bearing on differential | 1.3 Multijet 75 CV1.3 Multijet 90 CV 5 speed1.2 8v1.4 8v1.4 16v1.9 Multijet1.3 Multijet 90 CV 6 speed1.4 16v TJet |

| Two mechanics are needed for this operation. |
| Tool | Description | Function | Validity |
|---|---|---|---|
| 1871001014 | Gearbox support | Overhaul gearbox | 1.3 Multijet 75 CV1.3 Multijet 90 CV 5 speed1.2 8v1.4 8v1.4 16v TJet |
| Tool | Description | Function | Validity |
|---|---|---|---|
| 1870689000 | Mount | Gearbox support | 1.2 8v1.4 8v |
| Tool | Description | Function | Validity |
|---|---|---|---|
| 1860873000 | Gearbox support | Removing-refitting gearbox from the vehicle | 1.3 Multijet 75 CV1.3 Multijet 90 CV 5 speed1.2 8v1.4 8v1.4 16v TJet |