199002426 - 5570T49 BLUETOOTH ELECTRONIC CONTROL UNIT - R.R.
 Removing
		(
		Refitting
Removing
		(
		Refitting )
	- Make sure that the battery is disconnected.- Open the oddments compartment.1. Unscrew both bolts (1a) securing the control unit mounting (1b) and lower the actual mounting, releasing the front retainers (1c).2. Undo the retaining lever (2a) and disconnect the electrical connection (2b).
		)
	- Make sure that the battery is disconnected.- Open the oddments compartment.1. Unscrew both bolts (1a) securing the control unit mounting (1b) and lower the actual mounting, releasing the front retainers (1c).2. Undo the retaining lever (2a) and disconnect the electrical connection (2b).| Description | Connector | |
|---|---|---|
| 2b | BLUETOOTH CONTROL UNIT | See M162 BLUETOOTH CONTROL UNIT | 

 Refitting
		(
		Removing
Refitting
		(
		Removing )
	- Check that the control unit is not damaged.1. Position control unit (1a) in the mount and secure it using the bolts (1b).2. Secure the electrical connection.3. Fit mount (3a) in its seat and do up the front retainers (3b).4. Tighten the mount fixing bolts.- Connect the battery.
		)
	- Check that the control unit is not damaged.1. Position control unit (1a) in the mount and secure it using the bolts (1b).2. Secure the electrical connection.3. Fit mount (3a) in its seat and do up the front retainers (3b).4. Tighten the mount fixing bolts.- Connect the battery.|  | 
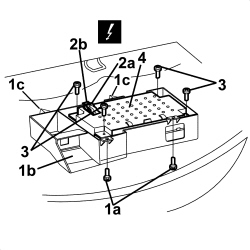
The control unit must be connected electrically at least 5 minutes before the key on. | 

|  | Some of the CAN nodes, including the Bluetooth control unit, are programmed with default settings that the customer will find when they purchase the vehicle. If the control unit is being replaced, the Parts Dept. will send a pristine component: once fitted, the data memorized in the Body Computer must be transferred to it by carrying out the PROXY ALIGNMENT procedure using the Examiner. |