199002796 - 7035B14 REAR WINDOW GLASS - R.R INCLUDES CLEANING HOUSING
 Removing
		(
		Refitting
Removing
		(
		Refitting )
	    Op. 5550D16  THIRD BRAKE LIGHT - R+R     Op. 7015A04  TAILGATE INTERIOR PANEL - R+R      Op. 5050C34  REAR WIPER ARM WITH BLADE - R+R - Remove the rear wiper motor and the seal on the glass.    Op. 5050C42  REAR WIPER MOTOR - R+R - Remove the rear parcel shelf and lower the rear seat backrests.1. Disconnect the heated rear windscreen electrical connections (1a, 1b).
		)
	    Op. 5550D16  THIRD BRAKE LIGHT - R+R     Op. 7015A04  TAILGATE INTERIOR PANEL - R+R      Op. 5050C34  REAR WIPER ARM WITH BLADE - R+R - Remove the rear wiper motor and the seal on the glass.    Op. 5050C42  REAR WIPER MOTOR - R+R - Remove the rear parcel shelf and lower the rear seat backrests.1. Disconnect the heated rear windscreen electrical connections (1a, 1b).| Description | Component | 
|---|---|
| HEATED REAR WINDSCREEN | See P055 HEATED REARSCREEN | 

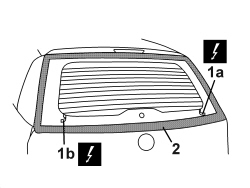
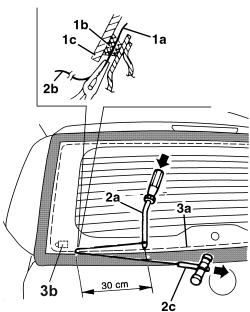
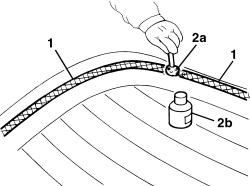
|  | When using piano wire, take care with the panel reinforcements located in the right and left side of the rearscreen housing. If these sections are difficult, use the vibrating cutter with an appropriate blade. | 


 Refitting
		(
		Removing
Refitting
		(
		Removing )
	1. Using suitable equipment, cut and level the bead of sealant in the rearcreen housing leaving a thickness of between 0.25 and 1 mm, taking care not to scratch the paintwork. The thickness of the sealant remaining in the housing will act as a support for the new bonding.2. Thoroughly clean the rearscreen housing using an air jet and degrease fully using heptane. When bonding, 60 minutes after the bead of sealant has been cut and levelled, the surface of the actual sealant must be treated using the special activating product and it is necessary to wait for 15 minutes before fitting the windscreen.
		)
	1. Using suitable equipment, cut and level the bead of sealant in the rearcreen housing leaving a thickness of between 0.25 and 1 mm, taking care not to scratch the paintwork. The thickness of the sealant remaining in the housing will act as a support for the new bonding.2. Thoroughly clean the rearscreen housing using an air jet and degrease fully using heptane. When bonding, 60 minutes after the bead of sealant has been cut and levelled, the surface of the actual sealant must be treated using the special activating product and it is necessary to wait for 15 minutes before fitting the windscreen.| Component | Type | Description | Classification | Qty. | Validity | 
|---|---|---|---|---|---|
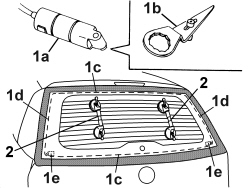
| REARSCREEN HOUSING | Activator for PUR | - | - | 


|  | Wait for about 15 minutes before continuing with the next operation to allow the adhesion promoter (primer) thinner to evaporate. | 

| Component | Type | Description | Classification | Qty. | Validity | 
|---|---|---|---|---|---|
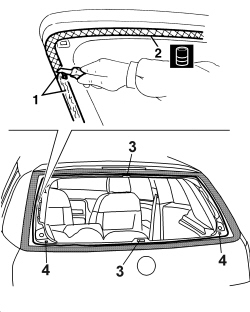
| REARSCREEN GLASS | Glass sealant | Product n° 71711976 | - | 
|  | Start the operation from the centre of the lower edge and continue without breaks along the entire perimeter of the glass. | 


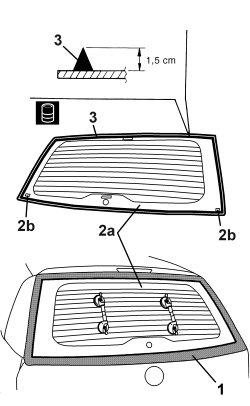
|  | Do not move the vehicle for the time recommended by the supplier of the sealant. |