2584837 - 5040C24 air conditioner box - dismantle and rebuild at bench
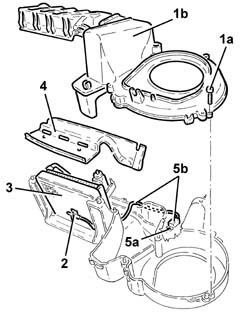
1. Disconnect the electrical connectors (1a) and (1b) and the air conditioner controls lights (1c). | Name | Connector |
|---|---|---|
| 1a | Climate control controls | See H80 CLIMATE CONTROL CONTROLS ( AIR CONDITIONING ) |
| Name | Connector |
|---|---|---|
| 1b | Climate control fan control | See H081 CLIMATE CONTROL FAN CONTROL |
| Name | Connector |
|---|---|---|
| 1c | Air conditioning/heater controls light | See G45 AIR CONDITIONING/HEATER CONTROLS LIGHT |

| Name | Connector |
|---|---|---|
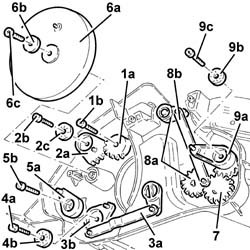
| 1a | Passenger compartment air fan adjustment resistor | See O30 PASSENGER COMPARTMENT AIR FAN ADJUSTMENT RESISTOR ( HEATER ) |
| Name | Connector |
|---|---|---|
| 1b | Electronic thermostat | See N86 ELECTRONIC THERMOSTAT |
| Name | Connector |
|---|---|---|
| 1c | Passenger compartment ventilation fan | See N85 PASSENGER COMPARTMENT VENTILATION FAN ( HEATER ) |


| Name | Connector |
|---|---|---|
| - | Passenger compartment ventilation fan | See N85 PASSENGER COMPARTMENT VENTILATION FAN ( HEATER ) |
| Name | Connector |
|---|---|---|
| - | Passenger compartment air fan adjustment resistor | See O30 PASSENGER COMPARTMENT AIR FAN ADJUSTMENT RESISTOR ( HEATER ) |
| Name | Connector |
|---|---|---|
| - | Passenger compartment ventilation fan | See N85 PASSENGER COMPARTMENT VENTILATION FAN ( HEATER ) |
| Name | Connector |
|---|---|---|
| - | Climate control controls | See H80 CLIMATE CONTROL CONTROLS ( AIR CONDITIONING ) |
| Name | Connector |
|---|---|---|
| - | Climate control fan control | See H081 CLIMATE CONTROL FAN CONTROL |
| Name | Connector |
|---|---|---|
| - | Air conditioning/heater controls light | See G45 AIR CONDITIONING/HEATER CONTROLS LIGHT |