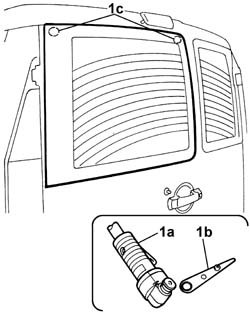
2585123 - 7035B24 tinted window of one load compartment rear door flap r r including cleaning of housing on flap

Removing ( Refitting ) Disconnect the battery negative terminal.    Op. 5050C34 REAR WIPER ARM WITH BLADE - R+R1. Disconnect the electrical connectors for the heated rear windscreen and place them at the side.

NameConnector
1Right heated rear windscreen    See P53 RIGHT HEATED REAR WINDSCREEN ( RIGHT DOOR )

NameConnector
1Left heated rear windscreen    See P054 LEFT HEATED REAR WINDSCREEN
Apply adhesive tape to protect the top and bottom edges of the bodywork.The bead of sealant for the rearscreen can be cut using either harmonic wire or the vibrating knife; both methods are described below.To cut the bead using harmonic wire, proceed as follows.1. Cut a section of harmonic wire about 50 cm long then, using pliers, insert one end (1a) of the harmonic wire through the bead of sealant (1b) which secures the window (1c).2. Secure one end of the wire to the special retaining tool (2a), inside the vehicle, and the other end to the traction handle (2b), outside the vehicle.
1. The operator inside the vehicle should keep the end of the tool (1a) pressed against the bead of sealant (1b) about 30 cm away from the point where the wire passes, whilst the other operator, outside the vehicle, should pull the handle (1c), following the surround of the windscreen.2. During cutting, be careful with the rear window''s centring side pins.
To cut the bead using the vibrating knife, proceed as described below.1. Use the vibrating knife (1a), with blade (1b), and cut the bead of sealant along the entire preimeter of the rear window, working from inside the car, taking care over the centering pins (1c).
1. After cutting the whole bead of sealant, fit the suction handles on the rear window, then with the assistance of a second operator, remove the rear window and rest it on a supporting stand.
Refitting ( Removing ) 1. Using a suitable tool, cut and smooth off the bead of sealant in the rear window frame, so as to leave a thickness of between 0.25 and 1 mm, without scratching the paintwork.
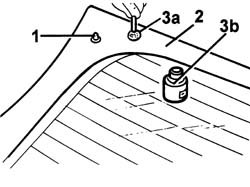
The sealant left in the housing will act as a backing for the new bond.
2. Clean the rear window seating carefully with compressed air and degrease thoroughly with heptane.If bonding takes place 60 minutes after cutting and smoothing the bead of sealant, treat the sealant surface with the specific activator and wait 15 minutes before fixing the windscreen.

TypeComponentNameQty.
-PRIMERTAIL-GATE GLASS SEALING STRIP--
Touch up the paintwork if necessary.
If the same windscreen is being reused.If this is not the case, use a new windscreen and proceed as described below.1. Fit locating pins.2. Degrease the screen printed area around the edge of the new window.3. Apply glass adhesion promoter (primer) (3b) to the screen printed area round the outside using applicator (3a) provided in the kit.
Wait for 15 minutes before carrying out the next operation to give the primer thinner time to evaporate.
Remove the adhesive tape from the edges of the bodywork, along the top and bottom perimeter of the rear window frame.1. Test fit the rear window and check that it is centred properly.
Use an air gun to extrude a bead of sealant as evenly as possible along the perimeter of the rear window.

TypeComponentNameQty.
-Product n° 71711976TAIL-GATE GLASS SEALING STRIP--
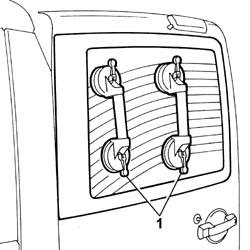
Begin applying the sealant from the middle of the lower edge and continue without breaks around the entire edge of the window.
1. With the assistance of a second operator, fit the rear window in its seating immediately after applying the sealant and bed it in place.2. Fit the belt (2a) and adjust the tension to apply uniform pressure over the entire back window in order to ensure a correct match between window (2b), sealant (2c) and rearscreen housing (2d).
Connect the electrical connectors for the heated rear windscreen.

NameConnector
-Right heated rear windscreen    See P53 RIGHT HEATED REAR WINDSCREEN ( RIGHT DOOR )

NameConnector
-Left heated rear windscreen    See P054 LEFT HEATED REAR WINDSCREEN
    Op. 5050C34 REAR WIPER ARM WITH BLADE - R+RConnect the battery negative terminal.