2585291 - 1028H14 piston connecting rod set - r r
| Description | Code | |
|---|---|---|
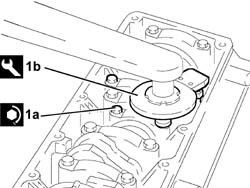
| 1b | Spanner | 1.860.833.000 |
| Description | Code | |
|---|---|---|
| 2b | Spanner | 1.860.834.000 |
| To release the sump from the crankcase, tap tool (3b) in between them using a mallet, then use a screwdriver for leverage in the projections in the sides of the crankcase sump. |
| Description | Code | |
|---|---|---|
| 3b | Blade | 1.870.718.000 |


| Description | Code | |
|---|---|---|
| 1 | Flange | 1.860.815.000 |
| Mark the connecting rod caps with a progressive number to define their position for installation. |

| Fit the piston-connecting rod assemblies in the crankcase so that the oil spray undercut on the piston is facing the inlet side. |
| Fit the connecting rods so that the number stamped on each rod faces toward the same side as the number stamped on the big end (inlet side). |

| Fastening | Component | dia | Value(daNm) | |
|---|---|---|---|---|
| 1a | Bolt | CONNECTING ROD CAPS | M9 | 2.4 - 2.6 + 60° |
| Description | Code | |
|---|---|---|
| 1b | Torque wrench | 1.860.942.000 |
| Description | Code | |
|---|---|---|
| - | Flange | 1.860.815.000 |
| Type | Component | Description | Qty. | |
|---|---|---|---|---|
| - | Sealant | ENGINE OIL SUMP | Silicon sealant | - |
| Fastening | Component | dia | Value(daNm) | |
|---|---|---|---|---|
| - | Side bolts | ENGINE OIL SUMP | M8 | 2.1 - 2.6 |
| Description | Code | |
|---|---|---|
| - | Spanner | 1.860.834.000 |
| Fastening | Component | dia | Value(daNm) | |
|---|---|---|---|---|
| - | Front and rear bolts | ENGINE OIL SUMP | M6 | 0.7 - 0.9 |
| Description | Code | |
|---|---|---|
| - | Spanner | 1.860.833.000 |