323001467 - 2110D10 DIFFERENTIAL INTERNAL CASING - R + R WITH MANUAL GEARBOX REMOVED - INCLUDES GEARBOX DISMANTLING AND REASSEMBLY

Removing ( Refitting ) - Release the gearbox and differential from the support tool used for the removing-refitting from the vehicle.
ToolDescriptionFunctionValidity
1860873000Gearbox supportRemoving-refitting gearbox from the vehicle1.4 8v1.4 16v TJET1.3 Multijet
1. Fit the gearbox and differential (1a) on the overhaul stand (1b) using the tool (1c).
Two mechanics are needed for this operation.
ToolDescriptionFunctionValidity
1871000000Rotating standOverhaul gearbox1.3 Multijet1.4 16v TJET
ToolDescriptionFunctionValidity
1871001014Gearbox supportOverhaul gearbox
2. Unscrew the bolt (2a) and remove the mileometer idler gear (2b).3. Undo the bolts (3a) and remove the rear cover (3b).
1. Undo the bolts (1a) and remove the gear selection/engagement device mounting bracket (1b).
1. Remove the left differential internal driveshaft (1a) using the tool comprising the brackets (1b), the element (1c) and the mallet (1d).
ToolDescriptionFunctionValidity
1840005308BracketsRemoving left differential internal driveshaft1.3 Multijet1.4 16v TJET
ToolDescriptionFunctionValidity
1840005001StrutRemoving left differential internal driveshaftExtracting main shaft front bearingRemoving layshaft front bearing inner raceRemoving 4th speed drive gear and rear bearingRemoving 3rd and 4th speed engagement sliding sleeve hub, synchronizer ring and 3rd speed drive gearRemoving main shaft front bearing
ToolDescriptionFunctionValidity
1840206000MalletRemoving left differential internal driveshaft1.3 Multijet1.4 16v TJET
- Engage any gear using the gear selection/engagement lever.1. Undo the bolt fixing the 5th speed fork to the main shaft.- Engage 5th speed by pressing the fork on the main shaft.
If two gears are engaged simultaneously the gear shafts will lock.
2. Remove the staking and loosen the ring nuts for the main and layshafts.- Place the 5th speed control fork in neutral.
The positioning of the 5th speed control fork in neutral is necessary to prevent the synchronizer rollers from being lost.
1. Completely undo the ring nuts for the main and layshafts.2. Remove the 5th speed driven gear.3. Remove the 5th speed synchronizer rollers and springs retaining flange.4. Remove the 5 th speed control fork.5. Remove the Reverse engagement sliding sleeve.6. Remove the pre-synchronizer mountings.7. Remove the 5th speed engagement sliding sleeve.8. Remove the 5th speed synchronizer ring.9. Remove the 5th speed drive gear.10. Remove the needle bearing for the 5th speed drive gear.11. Remove the 5th speed drive gear bush.12. Undo the bolt (12a) and remove the main and layshaft rear bearing retaining plate (12b).
1. Lock the sleeve (1a) in the vice fitted with protective plates then, use a brass drift (1b) alternately on the two ends of the fork (1c) until it is released from the sleeve.
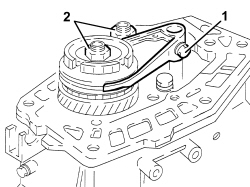
take care not to nick the tapered part of the sleeve and the ends of the fork with the drift.
1. Remove the main and layshaft rear bearing circlips.
1. Undo the plugs for positioning the gear control rods.2. Undo the reverse shaft fixing bolt.3. Unscrew the reversing light switch.
1. Undo the fixing bolts and remove the differential flange (1a) complete with O-ring (1b), oil seal (1c) and scraper ring (1d).
1. Undo the bolts fixing the gearbox casing to the manual gearbox and engine support.2. Place the gear selector lever downwards.3. Remove the gearbox casing using two screwdrivers for leverage by the special projections.
1. Remove the differential assembly.
Refitting ( Removing ) - Fit the differential assembly.- Place all the gear control forks in neutral.- Apply sealant to the contact surfaces between the manual gearbox bell housing and the gearbox casing.- Fit the gearbox casing on the manual gearbox bell housing.
Keep the gear selector/engagement lever upwards and check that the gear selector engages in the 3rd-4th speed control fork.
- Tighten the gearbox casing bolts to torque.
ComponentFasteningdia  Value (daNm)Validity
Gearbox casingBoltM82.1 ÷ 2.61.3 Multijet
- Fit the gear control rod positioning plugs.- Tighten the reverse shaft bolt to the recommended torque.
ComponentFasteningdia  Value (daNm)Validity
Reverse shaftBoltM82.9 ÷ 3.61.3 Multijet
- Fit the reversing light switch.- Fit the main and layshaft rear bearing circlips.
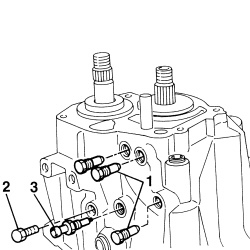
Position the circlips with their openings at the front to facilitte fitting.
- Apply sealant to the contact surfaces betwen the gearbox casing and the main and layshaft rear bearings retaining plate.- Fit the main and layshaft rear bearings retaining plate and secure it tightening the bolt to torque.
ComponentFasteningdia  Value (daNm)Validity
Main and layshaft rear bearings retaining plateBoltM82.1 ÷ 2.61.3 Multijet
1. Remove the 5th speed drive gear bush.2. Fit the needle bearing for the 5th speed drive gear.3. Fit the 5th speed drive gear.4. Fit the 5th speed synchroniser gear.5. Fit the 5th speed engagement sliding sleeve.6. Fit the 5th speed engagement sliding sleeve.7. Place the synchronizer mountings in their housings.8. Fit the 5 th speed control fork.9. Fit the 5th speed synchronizer rollers and springs retaining flange.10. Fit the 5th speed driven gear.11. Tighten the new ring nuts for the main and layshafts to torque.
ComponentFasteningdia  Value (daNm)Validity
Main and layshaft ring nutsRing nutM2010 ÷ 12.41.3 Multijet
12. Tighten the bolt for the 5th speed control fork to the recommended torque.
ComponentFasteningdia  Value (daNm)Validity
5th speed control forkBoltM61.5 ÷ 1.91.3 Multijet
1. Lock the sleeve in a vice fitted with protective plates;2. Position the fork so that the tapered part is in the same direction as that of the sleeve, resting it against the side of the sleeve with the smaller diameter.- fit the fork manually, exerting the necessary pressure, until it is completely inserted in the sleeve.
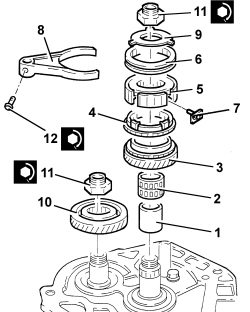
When the fitting is complete, check that the sleeve can rotate freely inside the fork.
- Apply sealant to the contact surfaces betwen the main and layshaft rear bearings retaining plate and the rear cover.1. Fit the rear cover (1a) and secure it tightening the bolts (1b) to torque.
ComponentFasteningdia  Value (daNm)Validity
Rear coverBoltM82.1 ÷ 2.61.3 Multijet
2. Fit the mileometer idler gear (2a) and secure it with screw (2b).
1. Position the tool (1a), complete with dial gauge, on the differential flange (1b) and measure distance "H" (flange height).
ToolDescriptionFunctionValidity
1895655000MountDetermining thickness of differential bearing scraper rings
1. Position the tool (1a) complete with dial gauge on the differential flange support surface (1b) and measure distance "P" (depth) between differential flange support plane and bearing outer race (1c).
ToolDescriptionFunctionValidity
1895655000MountDetermining thickness of differential bearing scraper rings
- Calculate the thickness "S" of the differential bearing pre-loading shim using the following formula:S = P - H + 0.12
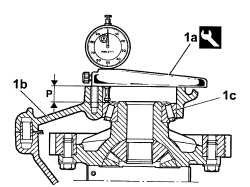
0.12 corresponds to the recommended interference for the bedding in and pre-loading of the differential bearings.After determining the exact value of the size of the scraper ring, try and get as close as possible to this value using the shims supplied as spares. If there is not or more shims available that correspond exactly to the value produced in this way, fit the shim(s) immediately larger.
1. Place the differential bearing pre-loading shim(s) in position.
1. Fit a new oil seal (1a) on the differential flange (1b) using the tool (1c).
ToolDescriptionFunctionValidity
1875016000Fitting toolFitting engine side oil seal for manual gearbox to engine supportFitting differential flange oil seal1.3 Multijet1.4 16v TJET
- Fit the differential flange and secure it tightening the bolts to torque.- Fit the left differential inner driveshaft.- Fit the gear selection/engagement mounting bracket and secure it using the bolts.- Undo the fastenings and remove the gearbox and differential from the support tool.
Two mechanics are needed for this operation.
ToolDescriptionFunctionValidity
1871001014Gearbox supportOverhaul gearbox
- Remove the support tool from the overhaul stand and put it down.- Position the gearbox and differential on the tool used for the removing-refitting from the vehicle.
ToolDescriptionFunctionValidity
1860873000Gearbox supportRemoving-refitting gearbox from the vehicle1.4 8v1.4 16v TJET1.3 Multijet