74711 - 1020A20 CRANKCASE SUMP - R.R. clean contact surfaces and apply sealant
| Description | Code | Function | |
|---|---|---|---|
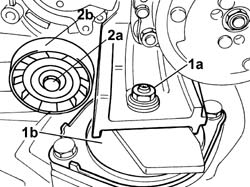
| 2a | Crossmember | 1.870.595.000 | Power unit support |
| Description | Code | Function | |
|---|---|---|---|
| 2b | Support mountings | 1.870.650.000 | Power unit support |
| Description | Code | Function | |
|---|---|---|---|
| 3a | Crossmember | 1.860.851.003 | Power unit support |
| Description | Code | Function | |
|---|---|---|---|
| 3b | Vertical support | 1.870.748.000 | Power unit support |

| Description | Connector | |
|---|---|---|
| 1 | Engine oil level sensor | K032 |

| Description | Connector | |
|---|---|---|
| 1b | Rpm sensor | K046 |


| Description | Code | Function | |
|---|---|---|---|
| 1c | Blade | 1.870.718.000 | Cutting engine oil sump sealant |


| Apply a continuous bead of sealant with no breaks. |
| Value - daNm | Fastening | Component | Ø | |
|---|---|---|---|---|
| . | 1.5 | Bolt | OIL SUMP | M7 |
| Value - daNm | Fastening | Component | Ø | |
|---|---|---|---|---|
| . | 5 | Plug | ENGINE OIL DRAIN PLUG | M22X 1.5 |
| Value - daNm | Fastening | Component | Ø | |
|---|---|---|---|---|
| . | 0.8 | Bolt | MANUAL GEARBOX/DIFFERENTIAL AND ENGINE MOUNTING SHIELD | M6 |
| Description | Connector | |
|---|---|---|
| Rpm sensor | K046 |
| Value - daNm | Fastening | Component | Ø | |
|---|---|---|---|---|
| . | 8 | Connector | OIL LEVEL DIPSTICK PIPE | M14 X 1.5 |
| Value - daNm | Fastening | Component | Ø | |
|---|---|---|---|---|
| . | 5.5 | Connector | OIL LEVEL DIPSTICK SENSOR | M12 X 1.25 |
| Description | Connector | |
|---|---|---|
| Engine oil level sensor | K032 |
| Value - daNm | Fastening | Component | Ø | |
|---|---|---|---|---|
| . | 1.9 | Bolt | SINGLE BELT FIXED TENSIONER VARIOUS | M8 |
| Value - daNm | Fastening | Component | Ø | |
|---|---|---|---|---|
| . | 4,5 | Nut | FRONT FLEXIBLE MOUNTING BLOCKS, POWER UNIT | M10X1.25 |