74677 - 1016C10 SINGLE CYLINDER HEAD - R.R. and Replace gasket

| Description | Connector | |
|---|---|---|
| 3 | Engine coolant level sensor | K026 |


| Description | Connector | |
|---|---|---|
| 2 | I.E. engine temperature sensor | K045 |

| Description | Connector | |
|---|---|---|
| 1a | Engine management control unit | M010A |
| Description | Connector | |
|---|---|---|
| 1a | Engine management control unit | M010B |
| Description | Connector | |
|---|---|---|
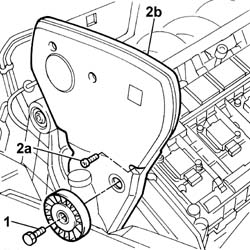
| 2b | Integrated throttle casing actuator | N075 |
| Description | Connector | |
|---|---|---|
| 2a | Earth on engine | C040 |

| Description | Connector | |
|---|---|---|
| 1a | Ignition coil | A030A |
| Description | Connector | |
|---|---|---|
| 1b | Injector | N070A |
| Description | Connector | |
|---|---|---|
| 1a | Ignition coil | A030B |
| Description | Connector | |
|---|---|---|
| 1a | Ignition coil | A030C |
| Description | Connector | |
|---|---|---|
| 1a | Ignition coil | A030D |
| Description | Connector | |
|---|---|---|
| 1a | Ignition coil | A030E |
| Description | Connector | |
|---|---|---|
| 1b | Injector | N070B |
| Description | Connector | |
|---|---|---|
| Injector | N070C |
| Description | Connector | |
|---|---|---|
| Injector | N070D |
| Description | Connector | |
|---|---|---|
| Injector | N070E |
| Description | Connector | |
|---|---|---|
| 2a | Lambda sensor on catalyzer | K017 |
| Description | Connector | |
|---|---|---|
| 2b | Lambda sensor on catalyzer 2 | K018 |

| Description | Code | Function | |
|---|---|---|---|
| . | Rapid attachment connector | 1.870.684.000 | Single fuel manifold pipe complete with injectors |

| Description | Connector | |
|---|---|---|
| 1a | Detonation sensor - 2 | K050 |
| Description | Connector | |
|---|---|---|
| 1b | Rpm sensor | K046 |

| Description | Connector | |
|---|---|---|
| 1a | Timing sensor | K047 |
| Description | Connector | |
|---|---|---|
| 1b | Detonation sensor - 2 | K051 |


| Description | Connector | |
|---|---|---|
| 1a | Variable geometry solenoid valve | L015 |
| Description | Connector | |
|---|---|---|
| 1b | Fuel vapour recovery solenoid valve | L010 |


| Description | Code | Function | |
|---|---|---|---|
| 2b | Spanner | 1.852.154.000 | Loosen/tighten cylinder head fixing bolts |

| The cylinder head gasket is the Astadur type. The material from which the gasket is made undergoes a polymerization process during the operation of the engine so that it becomes considerably harder during usage. The cylinder head gasket is the Astadur type. The material from which the gasket is made undergoes a polymerization process during the operation of the engine so that it becomes considerably harder during usage. In order for the polymerization process to take place, it is necessary to: - keep the gasket sealed in its container until it is fitted; - not lubricate the gasket or contact surfaces or get oil on them. |
| Follow the order shown in the figure for each tightening sequence. |
| Value - daNm | Fastening | Component | Ø | |
|---|---|---|---|---|
| 1a | 4 + 90° + 90° + 90° | Bolt | CYLINDER HEAD | M10 |
| Description | Code | Function | |
|---|---|---|---|
| 1b | Spanner | 1.852.154.000 | Loosen/tighten cylinder head fixing bolts |
| Description | Code | Function | |
|---|---|---|---|
| 1c | Torque wrench | 1.860.942.000 | Cylinder head bolts angular tightening |

| Value - daNm | Fastening | Component | Ø | |
|---|---|---|---|---|
| . | 2.5 | Nut | INLET MANIFOLD | M8 |
| Value - daNm | Fastening | Component | Ø | |
|---|---|---|---|---|
| . | 2.5 | Bolt | INLET MANIFOLD | M8 |
| Value - daNm | Fastening | Component | Ø | |
|---|---|---|---|---|
| . | 2.5 | Bolt | THERMOSTAT | M8 |
| Description | Code | Function | |
|---|---|---|---|
| 1b | Support for counter-torque | 1.860.831.000 | Loosen/tighten exhaust side camshaft drive pulley bolt |
| Description | Code | Function | |
|---|---|---|---|
| 1c | Spanner for rotating timing pullies | 1.860.831.002 | Loosen/tighten camshaft drive pulley bolt |
| Description | Code | Function | |
|---|---|---|---|
| 2b | Counter-torque | 1.860.856.000 | Loosen/tighten inlet side camshaft drive pulley bolts |

| Description | Code | Function | |
|---|---|---|---|
| 1a | Dial gauge support | 1.860.895.000 | Support |

| Mark the position of the camshaft caps removed so that they can be correctly positioned when refitting. |
| Check that the camshaft cam profile and the templates are correctly aligned. |
| Description | Code | Function | |
|---|---|---|---|
| 1a | Templates | 1.870.828.000 | Engine tuning |

| The belt is fitted with the arrow facing the direction of rotation of the engine. There are also three reference on the belt that should coincide during the initial fitting with the references on the toothed drive pulley and the exhaust and inlet side toothed driven pullies. |

| Value - daNm | Fastening | Component | Ø | |
|---|---|---|---|---|
| 1b | 2.5 | Nut | MOBILE TIMING TENSIONER | M8 |

| Value - daNm | Fastening | Component | Ø | |
|---|---|---|---|---|
| 1a | (inlet side) 0.9 | Bolt | TIMING DRIVEN PULLIES | M6 |
| Description | Code | Function | |
|---|---|---|---|
| 1b | Counter-torque | 1.860.856.000 | Loosen/tighten inlet side camshaft drive pulley bolts |
| Value - daNm | Fastening | Component | Ø | |
|---|---|---|---|---|
| 2a | (exhaust side) 12 | Bolt | TIMING DRIVEN PULLIES | M12 |
| Description | Code | Function | |
|---|---|---|---|
| 2b | Support for counter-torque | 1.860.831.000 | Loosen/tighten exhaust side camshaft drive pulley bolt |
| Description | Code | Function | |
|---|---|---|---|
| 2c | Spanner for rotating timing pullies | 1.860.831.002 | Loosen/tighten exhaust side camshaft drive pulley bolt |
| Description | Code | Function | |
|---|---|---|---|
| . | Templates | 1.870.828.000 | Engine tuning |
| Value - daNm | Fastening | Component | Ø | |
|---|---|---|---|---|
| . | 1.5 | Bolt | CAMSHAFT CAPS | M7 |
| Value - daNm | Fastening | Component | Ø | |
|---|---|---|---|---|
| . | 2.5 | Nut | MOBILE TIMING TENSIONER | M8 |

| Description | Code | Function | |
|---|---|---|---|
| . | Dial gauge support | 1.860.895.000 | T.D.C. check |
| Value - daNm | Fastening | Component | Ø | |
|---|---|---|---|---|
| . | 2.7 | - | SPARK PLUGS | M10 X 1.25 |
| Value - daNm | Fastening | Component | Ø | |
|---|---|---|---|---|
| . | 0.9 | Bolt | TIMING BELT PROTECTIVE COVER(S) | M6 |
| Value - daNm | Fastening | Component | Ø | |
|---|---|---|---|---|
| . | (on gearbox) 5 | Bolt | POWER UNIT GEAR BOX END RIGID MOUNT | M10 X 1.25 |
| Value - daNm | Fastening | Component | Ø | |
|---|---|---|---|---|
| . | 2.5 | Nut | EXHAUST MANIFOLD/S | M8 |
| Value - daNm | Fastening | Component | Ø | |
|---|---|---|---|---|
| . | (to bracket on bodyshell) 5 | Bolt | POWER UNIT REACTION ROD | M10 X 1.25 |
| Value - daNm | Fastening | Component | Ø | |
|---|---|---|---|---|
| . | (to engine support) 5 | Bolt | POWER UNIT REACTION ROD | M10 X 1.25 |
| Value - daNm | Fastening | Component | Ø | |
|---|---|---|---|---|
| . | 0.9 | Bolt | CAM COVER | M6 |
| Value - daNm | Fastening | Component | Ø | |
|---|---|---|---|---|
| . | 0.9 | Bolt | IGNITION COIL/REEL | M6 |
| Description | Connector | |
|---|---|---|
| . | Integrated throttle casing actuator | N075 |
| Description | Connector | |
|---|---|---|
| . | Engine management control unit | M010A |
| Description | Connector | |
|---|---|---|
| . | Engine management control unit | M010B |
| Description | Connector | |
|---|---|---|
| . | Injector | N070A |
| Description | Connector | |
|---|---|---|
| . | Injector | N070B |
| Description | Connector | |
|---|---|---|
| . | Injector | N070C |
| Description | Connector | |
|---|---|---|
| . | Injector | N070D |
| Description | Connector | |
|---|---|---|
| . | Injector | N070E |
| Description | Connector | |
|---|---|---|
| . | Ignition coil | A030A |
| Description | Connector | |
|---|---|---|
| . | Ignition coil | A030B |
| Description | Connector | |
|---|---|---|
| . | Ignition coil | A030C |
| Description | Connector | |
|---|---|---|
| . | Ignition coil | A030D |
| Description | Connector | |
|---|---|---|
| . | Ignition coil | A030E |
| Description | Connector | |
|---|---|---|
| . | Lambda sensor on catalyzer | K017 |
| Description | Connector | |
|---|---|---|
| . | Lambda sensor on catalyzer 2 | K018 |
| Description | Connector | |
|---|---|---|
| . | Detonation sensor - 2 | K050 |
| Description | Connector | |
|---|---|---|
| . | Rpm sensor | K046 |
| Description | Connector | |
|---|---|---|
| . | Detonation sensor - 2 | K051 |
| Description | Connector | |
|---|---|---|
| . | Timing sensor | K047 |