939010397 - 1004D10 POWER UNIT (MANUAL GEARBOX), REMOVED, DISMANTLE AND REASSEMBLE

Removing
(
Refitting
)
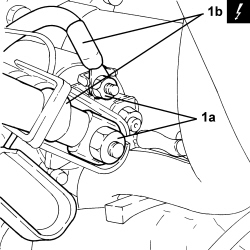
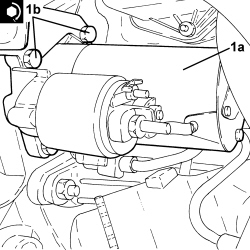
1. Undo the nuts (1a) and disconnect the electrical connections (1b) from the starter motor.
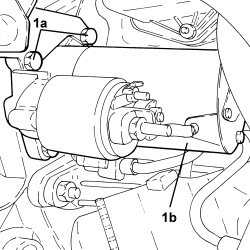
1. Undo the bolts (1a) and remove the starter motor (1b).
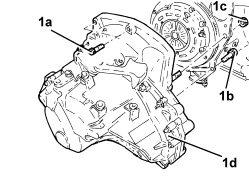
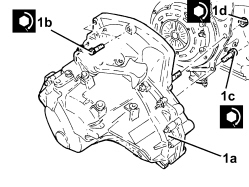
1. Undo the bolts (1a), (1b) and the nuts (1c) and remove the manual gearbox (1d). | Two mechanics are needed for this operation. |
1. Fit the flywheel lock.| Tool | Description | Function | Validity |
|---|
| 1860846000 | Counter-torque | Flywheel lock | |
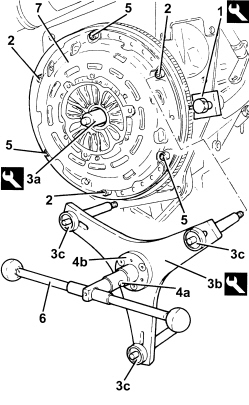
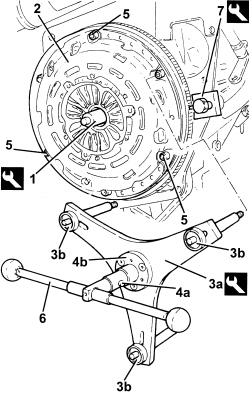
2. Unscrew the three bolts spaced at 120° securing the clutch cradle.3. Fit the locating pin (3a) and the remaining part of tool (3b), tightening bolts (3c) into the sockets of the bolts removed previously.| Tool | Description | Function | Validity |
|---|
| 1871003100 | Extractor/ fitting tool | Clutch mechanism removal | 3.2 JTS2.4 JTD 20V |
4. Turn the tool handwheel until pins (4a) are in contact with disc (4b).5. Undo the remaining bolts securing the clutch cradle.
6. Undo the tool handwheel to discharge the clutch mechanism diaphragm spring.- Remove the tool.| Tool | Description | Function | Validity |
|---|
| 1871003100 | Extractor/ fitting tool | Clutch mechanism removal | 3.2 JTS2.4 JTD 20V |
7. Remove the clutch tray.- Remove the clutch plate.
Refitting
(
Removing
)
1. Fit the tool locating pin into the crankshaft.2. Refit the clutch mechanism in position. | It is not possible to replace the cltuch plate on its own. Instead the clutch plate/cradle assembly must be replaced. |
| When fitting the clutch plate the correct installation position is shown by the words "engine side" or "gearbox side". |
| Handle the clutch plate carefully. Do not touch the surfaces of the friction linings with your hands. |
| Clean any anti-corrosion protection or detergents from the friction surface of the clutch tray. |
3. Fit the remaining part of tool (3a) for fitting the clutch device and tighten bolts (3b).4. Turn the tool handwheel until pins (4a) are in contact with disc (4b).5. Hand tighten the three free retaining bolts until the clutch device is packed together.6. Undo the tool handwheel to discharge the clutch mechanism diaphragm spring.- Remove the tool.| Tool | Description | Function | Validity |
|---|
| 1871003100 | Extractor/ fitting tool | Clutch mechanism removal | 3.2 JTS2.4 JTD 20V |
- Tighten the remaining clutch fixing bolts by hand.- Gradually tighten the bolts fixing the clutch diagonally until the recommended torque is reached.| Component | Fastening | dia | Value (daNm) | Validity |
|---|
| Clutch drip tray | Bolt (pretreated to be replaced) | M8 | (Engine flywheel side) 2.8 | 2.4 JTD 20V |
7. Remove the flywheel lock.| Tool | Description | Function | Validity |
|---|
| 1860846000 | Counter-torque | Flywheel lock | |
1. Place the manual gearbox (1a) in its housing and secure it tightening the bolts (1b) and (1c) and the nuts (1d) to the recommended torque.| Component | Fastening | dia | Value (daNm) | Validity |
|---|
| Manual gearbox | Bolt | M12 | (engine block side) 7.2 - 8.8 | 2.4 JTD 20V |
| Component | Fastening | dia | Value (daNm) | Validity |
|---|
| Manual gearbox | Bolt | M10 | (engine block side) 5.0 - 6.1 | 2.4 JTD 20V |
| Component | Fastening | dia | Value (daNm) | Validity |
|---|
| Manual gearbox | Nut | M12 | (engine block side) 7.2 - 8.8 | 2.4 JTD 20V |
1. Place the starter motor (1a) in its housing and secure it tightening the bolts (1b) to the recommended torque.| Component | Fastening | dia | Value (daNm) | Validity |
|---|
| STARTER MOTOR | Bolt | M8x45 | 2.2 ÷ 2.6 | |
- Connect the electrical connections to the starter motor and secure them using the nuts.