3314053 - 1020A20 crank case oil sump - r + r clean seals for sealant application (Automatic transmission)
 | Name | Connector |
|---|---|---|
| - | Battery | A1B |
| Collect the engine oil in a suitable container. Engine oil contains substances harmful to the environment. Discard these substances in containers designed for their disposal. |


| Name | Connector |
|---|---|---|
| 2 | Engine oil level sensor | K32 |

 | Name | Country |
|---|---|---|
| 1b | Key | 1.860.833.000 |
| Name | Country |
|---|---|---|
| 2b | Key | 1.860.834.000 |
| Name | Country |
|---|---|---|
| 4 | Blade | 1.870.718.000 |

| Apply a continuous bead of sealant with no breaks. |
| When fitting the crankcase sump, avoid major sideways movements which may remove the sealant. |
| Apply a continuous bead of sealant with no breaks. |
 | Fastening | Component | Ø | Value(daNm) |
|---|---|---|---|---|
| 2a | Side bolts | OIL SUMP | M8 | (Engine crankcase side) 2.3 ÷ 2.8 |
| Name | Country |
|---|---|---|
| 2b | Key | 1.860.834.000 |
| Fastening | Component | Ø | Value(daNm) |
|---|---|---|---|---|
| 3a | Front and rear bolts | OIL SUMP | M6 | (Crankcase front/rear covers side) 0.8 ÷ 0.9 |
| Name | Country |
|---|---|---|
| 3b | Key | 1.860.833.000 |

| Fastening | Component | Ø | Value(daNm) |
|---|---|---|---|---|
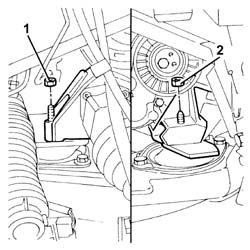
| 1 | - | - | - | - |
| Fastening | Component | Ø | Value(daNm) |
|---|---|---|---|---|
| 2 | Nut | POWER UNIT RIGID REAR MOUNT | M10 | (Flexible mounting side) 3.8 ÷ 4.7 |

| Fastening | Component | Ø | Value(daNm) |
|---|---|---|---|---|
| 1 | Bolt | OIL SUMP | M10 | (Manual gearbox side) 5.0 ÷ 6.1 |

| Fastening | Component | Ø | Value(daNm) |
|---|---|---|---|---|
| - | - | ENGINE OIL DRAIN PLUG | M18 | (Crankcase sump side) 1.8 ÷ 2.2 |