194000442 - 2110A10 MANUAL GEARBOX AND DIFFERENTIAL - R + R

Removing
(
Refitting
)
- Position the vehicle on a lift.- Make sure that the ignition key is in the OFF position, then disconnect the battery terminal (-). Op. 4450B12 FRONT WHEELS (TWO) - R+R Op. 7055B66 ENGINE COMPARTMENT DUST COVER IN RIGHT FRONT WHEEL ARCH - R.R. Op. 7055B91 RIGHT FRONT WHEEL ARCH LINER - R.R. Op. 7055B90 LEFT FRONT WHEEL ARCH LINER - R.R. Op. 1080B95 REAR LAMBDA SENSOR TO CATALYTIC CONVERTER - R.R Op. 1076B18 RIGID SECTION OF EXHAUST PIPE BETWEEN CATALYTIC CONVERTER AND SILENCER - R + R Op. 7055A43 CENTRE FRONT GRILLE - R.R. Op. 4410D10 FRONT SUSPENSION FRAME - R+R Op. 5520B10 STARTER MOTOR - R+R1. Disconnect the gear selector cable.2. Disconnect the gear engagement cable.
1. Open the clips (1a) and release the gear selector and engagement cables (1b) from the mounting bracket.
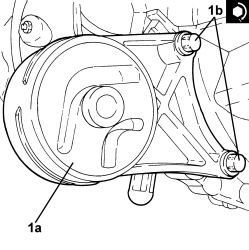
1. Release the retaining clip (1a) and disconnect the pipe (1b) between the damper and the clutch operating cylinder (1b), operating cylinder side. | Collect the bake/clutch fluid that comes out in a suitable container. |
2. Disconnect the electrical connection from the reversing light switch.
3. Undo the bolt (3a) and disconnect the earth lead (3b) from the gearbox.
1. Fit the tool (1a) complete with support mountings (1b).| Tool | Description | Function | Validity |
|---|
| 1820581000 | Crossmember | Power unit support | |
| Tool | Description | Function | Validity |
|---|
| 1870650000 | Support blocks | Power unit support | |
2. Fit the tools (2a) and (2b), then connect them to the brackets on the engine using links (2c).| Tool | Description | Function | Validity |
|---|
| 1860851003 | Crossmember | Power unit support | |
| Tool | Description | Function | Validity |
|---|
| 1870748000 | Vertical support | Power unit support | |
1. Undo the bolts fixing the gearbox side power unit flexible mounting to the rigid support.2. Undo the bolts (2a) and remove the power unit gearbox side rigid support (2b).
1. Undo the upper bolts fixing the manual gearbox to the engine block.
1. Undo the bolts (1a) and remove the left side engine support flexible mounting (1b).
1. Undo the bolts (1a) and remove the bracket on the gearbox for the lower reaction rod (1b).
- Using the two engine supporting rods, lower the power unit so that the gearbox is in a position that it can be removed from the engine.1. Fit the tool complete with hydraulic jack for removing the manual gearbox.| Tool | Description | Function | Validity |
|---|
| 1870847000 | Support | Removing-refitting manual gearbox | |
1. Undo the remaining bolts and the nut securing the manual gearbox.2. Detach the manual gearbox and differential from the engine, then carefully lower the hydraulic jack.
Refitting
(
Removing
)
- Carefully raise the manual gearbox and differential using the hydraulic jack.- Align the manual gearbox and tighten it evenly to the engine. | Before fitting the manual gearbox to the engine, apply a thin layer of lubricating grease to the shaft teeth. |
1. Tighten the bolts (1a), (1b) and the nut (1c) securing the manual gearbox to the specified torque.| Component | Fastening | dia | Value (daNm) | Validity |
|---|
| Manual gearbox | Bolt | M12 | (engine crankcase side) 4.8 - 7.2 | 1.9 JTD 16v1.9 JTD 8v |
| Component | Fastening | dia | Value (daNm) | Validity |
|---|
| Engine oil sump | Bolt | M10 | (gearbox side) 3.2 - 4.8 | 1.9 JTD 16v 1.9 JTD 8v |
| Component | Fastening | dia | Value (daNm) | Validity |
|---|
| Manual gearbox | Nut | M12 | (engine crankcase side) 4.8 - 7.2 | 1.9 JTD 16v1.9 JTD 8v |
- Remove the tool complete with hydraulic jack used for removing the manual gearbox.| Tool | Description | Function | Validity |
|---|
| 1870847000 | Support | Removing-refitting manual gearbox | |
- Adjust the rods for the tools for supporting the engine to place the power unit in the correct position.1. Refit the lower reaction rod bracket (1a) in its seat on the gearbox and secure it by tightening the bolts (1b) to the recommended torque.| Component | Fastening | dia | Value (daNm) | Validity |
|---|
| Bracket on gearbox for lower reaction rod | Bolt | M12 | (gearbox side) 7.5 - 8.5 | |
1. Place the left side engine support flexible mounting (1a) in its housing and secure it tightening the bolts (1b) to the recommended torque.| Component | Fastening | dia | Value (daNm) | Validity |
|---|
| Flexible mounting for left side engine support | Bolt | M12 | (gearbox side) 7.5 - 8.5 | |
1. Place the power unit gearbox side rigid support (1a) in its housing and secure it tightening the bolts (1b) to the recommended torque.| Component | Fastening | dia | Value (daNm) | Validity |
|---|
| Gearbox side power unit rigid support | Bolt | M10/12 | (gearbox side) 5.0 - 6.0 | |
2. Tighten the bolts fixing the gearbox side power unit flexible mounting to the rigid support to the recommended torque.| Component | Fastening | dia | Value (daNm) | Validity |
|---|
| Gearbox side support flexible mounting | Bolt | M10 | (support side) 5.0 - 6.0 | |
- Remove the tools used for supporting the engine.| Tool | Description | Function | Validity |
|---|
| 1820581000 | Crossmember | Power unit support | |
| Tool | Description | Function | Validity |
|---|
| 1870650000 | Support blocks | Power unit support | |
| Tool | Description | Function | Validity |
|---|
| 1860851003 | Crossmember | Power unit support | |
| Tool | Description | Function | Validity |
|---|
| 1870748000 | Vertical support | Power unit support | |
- Connect the earth lead to the gearbox and secure it using the bolt.- Connect the electrical connection to the reversing light switch.- Connect the pipe between the damper and clutch operating cylinder, operating cylinder side and secure it using the retaining clip.- Fasten the gear selection and engagement cables to the mounting bracket securing them using the clips.- Connect the gear engagement cable.- Connect the gear selector cable. Op. 5520B10 STARTER MOTOR - R+R Op. 4410D10 FRONT SUSPENSION FRAME - R+R Op. 7055A43 CENTRE FRONT GRILLE - R.R. Op. 1076B18 RIGID SECTION OF EXHAUST PIPE BETWEEN CATALYTIC CONVERTER AND SILENCER - R + R Op. 1080B95 REAR LAMBDA SENSOR TO CATALYTIC CONVERTER - R.R Op. 7055B90 LEFT FRONT WHEEL ARCH LINER - R.R. Op. 7055B91 RIGHT FRONT WHEEL ARCH LINER - R.R. Op. 7055B66 ENGINE COMPARTMENT DUST COVER IN RIGHT FRONT WHEEL ARCH - R.R. Op. 4450B12 FRONT WHEELS (TWO) - R+R Op. 0010T67 HYDRAULIC CLUTCH SYSTEM - BLEED AIR Op. 0010T67 HYDRAULIC CLUTCH SYSTEM - BLEED AIR Op. 0010T41 MANUAL GEARBOX OIL CHECK LEVEL AND TOP UP IF NECESSARY- Connect the negative battery terminal.- Remove the vehicle from the lift.