194001030 - 7040A98 INSTRUMENT PANEL TRIM SUPPORTING CROSSMEMBER - R.R. WITH DASHBOARD REMOVED
| Before removing and refitting the Air Bags the following preliminary operations must be carried out. |
| Description | Connector | |
|---|---|---|
| BATTERY | See A001 BATTERY |
| FOLLOW ALL THE RECOMMENDED SAFETY INSTRUCTIONS Op. 5580C AIR BAG SYSTEM |
| Several of the CAN nodes, including the air conditioning control unit M070, instrument panel E050 and steering lock M089 nodes, are programmed with default settings that the customer will find when they acquire the vehicle. If the air conditioning and/or instrument panel and/or steering lock control unit is replaced, the Parts Dept. will send a pristine component. once fitted, the data memorized in the body computer must be transferred to it by carrying out the "PROXI ALIGNMENT" procedure using the Examiner. |
| Description | Connector | |
|---|---|---|
| CLIMATE CONTROL SYSTEM CONTROL UNIT | See M070 CLIMATE CONTROL SYSTEM CONTROL UNIT |
| Description | Connector | |
|---|---|---|
| INSTRUMENT PANEL | See E050 INSTRUMENT PANEL |
| Description | Connector | |
|---|---|---|
| STEERING LOCK CONTROL UNIT (NBS) | See M089 STEERING LOCK CONTROL UNIT (NBS) |
| Description | Connector | |
|---|---|---|
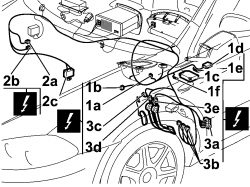
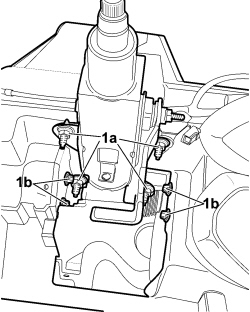
| 1a | AUTOMATIC TRANSMISSION GEAR SELECTOR CONTROL UNIT | See M053 AUTOMATIC TRANSMISSION GEAR SELECTOR CONTROL UNIT |
| Description | Connector | |
|---|---|---|
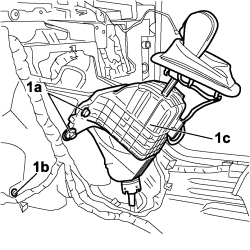
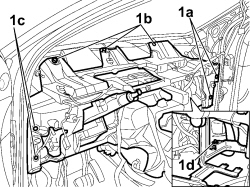
| 1b | DASHBOARD/AIR CONDITIONING - HEATER COUPLING | See D021 DASHBOARD/AIR CONDITIONING-HEATER COUPLING |
| Description | Connector | |
|---|---|---|
| 1c | AIR BAG CONTROL UNIT | See M060 AIR BAG CONTROL UNIT |
| Description | Connector | |
|---|---|---|
| 1d | SLEWING CONTROL UNIT | See M091 SLEWING CONTROL UNIT |
| Description | Connector | |
|---|---|---|
| 1e | AIR CONDITIONING UNIT EARTH | See C016 AIR CONDITIONING UNIT EARTH |
| Description | Connector | |
|---|---|---|
| 1f | AIR BAG SYSTEM EARTH | See C050 AIR BAG SYSTEM EARTH |
| Description | Connector | |
|---|---|---|
| 2a | HI FI SYSTEM COUPLING | See D068 HI-FI SYSTEM COUPLING |
| Description | Connector | |
|---|---|---|
| 2b | DASHBOARD/REAR COUPLING | See D020 DASHBOARD/REAR COUPLING |
| Description | Connector | |
|---|---|---|
| 2c | DASHBOARD/REAR COUPLING | See D020 DASHBOARD/REAR COUPLING |
| Description | Connector | |
|---|---|---|
| 2c | PASSENGER SIDE DASHBOARD EARTH | See C020 PASSENGER SIDE DASHBOARD EARTH |
| Description | Connector | |
|---|---|---|
| 3a | SHORT CIRCUITING COUPLING | See D097 SHORT CIRCUIT COUPLING |
| Description | Connector | |
|---|---|---|
| 3b | FRONT/DASHBOARD COUPLING | See D001 FRONT/DASHBOARD COUPLING |
| Description | Connector | |
|---|---|---|
| 3c | ACCELERATOR PEDAL POTENTIOMETER | See K055 ACCELERATOR PEDAL POTENTIOMETER |
| Description | Connector | |
|---|---|---|
| 3d | BRAKE PEDAL SWITCH | See I030 BRAKE PEDAL SWITCH |
| Description | Connector | |
|---|---|---|
| 3e | CLUTCH PEDAL SWITCH | See I031 CLUTCH PEDAL SWITCH |
| Component | Fastening | dia | Value (daNm) | Validity |
|---|---|---|---|---|
| CROSSMEMBER TO BODYSHELL (LEFT/RIGHT BRACKET) | Bolt | M10x1.25 | 3,15 ÷ 3,85 |
| Component | Fastening | dia | Value (daNm) | Validity |
|---|---|---|---|---|
| STEERING CONTROL TO DASHBOARD | Nut | M8 | 1,2 ÷ 1,8 |
| Component | Fastening | dia | Value (daNm) | Validity |
|---|---|---|---|---|
| AUTOMATIC CONTROL ON DASHBOARD CROSSMEMBER | Bolt | M8 | 2,25 ÷ 2,75 | 2.2 1.9 JTD 16v2.4 JTD 20v |
| Description | Connector | |
|---|---|---|
| AUTOMATIC TRANSMISSION GEAR SELECTOR CONTROL UNIT | See M053 AUTOMATIC TRANSMISSION GEAR SELECTOR CONTROL UNIT |
| Description | Connector | |
|---|---|---|
| DASHBOARD/AIR CONDITIONING - HEATER COUPLING | See D021 DASHBOARD/AIR CONDITIONING-HEATER COUPLING |
| Description | Connector | |
|---|---|---|
| AIR BAG CONTROL UNIT | See M060 AIR BAG CONTROL UNIT |
| Description | Connector | |
|---|---|---|
| SLEWING CONTROL UNIT | See M091 SLEWING CONTROL UNIT |
| Description | Connector | |
|---|---|---|
| AIR CONDITIONING UNIT EARTH | See C016 AIR CONDITIONING UNIT EARTH |
| Description | Connector | |
|---|---|---|
| AIR BAG SYSTEM EARTH | See C050 AIR BAG SYSTEM EARTH |
| Description | Connector | |
|---|---|---|
| HI FI SYSTEM COUPLING | See D068 HI-FI SYSTEM COUPLING |
| Description | Connector | |
|---|---|---|
| DASHBOARD/REAR COUPLING | See D020 DASHBOARD/REAR COUPLING |
| Description | Connector | |
|---|---|---|
| PASSENGER SIDE DASHBOARD EARTH | See C020 PASSENGER SIDE DASHBOARD EARTH |
| Description | Connector | |
|---|---|---|
| SHORT CIRCUITING COUPLING | See D097 SHORT CIRCUIT COUPLING |
| Description | Connector | |
|---|---|---|
| FRONT/DASHBOARD COUPLING | See D001 FRONT/DASHBOARD COUPLING |
| Description | Connector | |
|---|---|---|
| ACCELERATOR PEDAL POTENTIOMETER | See K055 ACCELERATOR PEDAL POTENTIOMETER |
| Description | Connector | |
|---|---|---|
| BRAKE PEDAL SWITCH | See I030 BRAKE PEDAL SWITCH |
| Description | Connector | |
|---|---|---|
| CLUTCH PEDAL SWITCH | See I031 CLUTCH PEDAL SWITCH |
| Description | Connector | |
|---|---|---|
| BATTERY | See A001 BATTERY |